Lexus NX: Removal
REMOVAL
CAUTION / NOTICE / HINT
HINT:
- Use the same procedure for the RH and LH sides.
- The procedure listed below is for the LH side.
PROCEDURE
1. REMOVE FRONT DOOR TRIM COVER LH
Click here .gif)
2. REMOVE FRONT DOOR INSIDE HANDLE BEZEL PLUG LH
Click here
3. REMOVE POWER WINDOW REGULATOR MASTER SWITCH ASSEMBLY WITH FRONT DOOR ARMREST BASE PANEL (for Driver Side)
Click here
4. REMOVE POWER WINDOW REGULATOR SWITCH ASSEMBLY WITH FRONT DOOR ARMREST BASE PANEL (for Front Passenger Side)
Click here
5. REMOVE FRONT DOOR TRIM BOARD SUB-ASSEMBLY LH
Click here
6. REMOVE OUTER MIRROR CONTROL ECU ASSEMBLY
| (a) Disconnect the 2 connectors. |
|
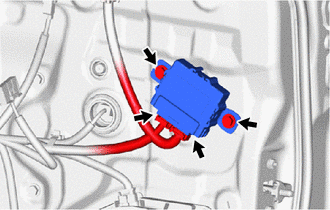
(b) Remove the 2 screws and outer mirror control ECU assembly.
READ NEXT:
 Installation
INSTALLATION CAUTION / NOTICE / HINT HINT:
Use the same procedure for the RH and LH sides.
The procedure listed below is for the LH side.
PROCEDURE 1. INSTALL OUTER MIRROR CONTROL ECU ASSEMBLY
Components
COMPONENTS ILLUSTRATION *1 OUTER MIRROR SWITCH ASSEMBLY *2 POWER WINDOW REGULATOR MASTER SWITCH ASSEMBLY WITH FRONT DOOR ARMREST BASE PANEL
SEE MORE:
Lost Communication with Cruise Control Front Distance Range Sensor Single Sensor or Center Missing Message (U023587)
DESCRIPTION The forward recognition camera is connected to the millimeter wave radar sensor assembly via the CAN communication line. When the signal from the millimeter wave radar sensor assembly is interrupted, the forward recognition camera outputs U023587. DTC No. Detection Item DTC Detect
Data List / Active Test
DATA LIST / ACTIVE TEST DATA LIST HINT: Using the Techstream to read the Data List allows the values or states of switches, sensors, actuators and other items to be read without removing any parts. This non-intrusive inspection can be very useful because intermittent conditions or signals may be dis
© 2016-2026 Copyright www.lexunx.com
