Lexus NX: Components
Lexus NX Service Manual / Vehicle Interior / Meter / Gauge / Display / Combination Meter / Components
COMPONENTS
ILLUSTRATION
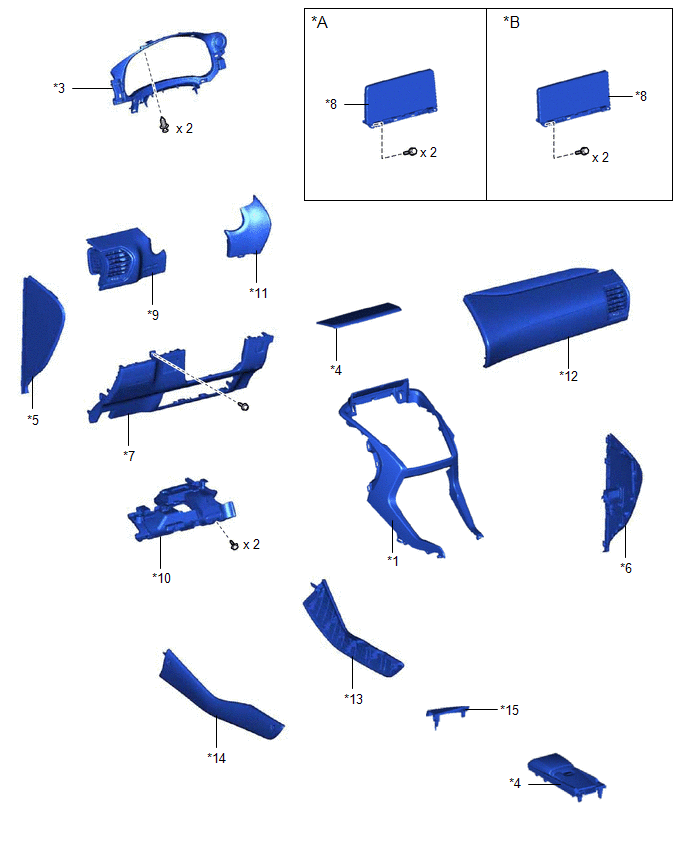
| *A | for 8 Inch Display | *B | for 10.3 Inch Display |
| *1 | CENTER INSTRUMENT CLUSTER FINISH PANEL ASSEMBLY | *2 | CONSOLE ARMREST ASSEMBLY |
| *3 | INSTRUMENT CLUSTER FINISH PANEL SUB-ASSEMBLY | *4 | INSTRUMENT PANEL FINISH PLATE |
| *5 | INSTRUMENT SIDE PANEL LH | *6 | INSTRUMENT SIDE PANEL RH |
| *7 | LOWER NO. 1 INSTRUMENT PANEL FINISH PANEL | *8 | MULTI-DISPLAY ASSEMBLY WITH BRACKET |
| *9 | NO. 1 INSTRUMENT PANEL SAFETY PAD SUB-ASSEMBLY | *10 | NO. 1 INSTRUMENT PANEL UNDER COVER SUB-ASSEMBLY |
| *11 | NO. 1 SWITCH HOLE BASE | *12 | NO. 2 INSTRUMENT PANEL SAFETY PAD SUB-ASSEMBLY |
| *13 | UPPER NO. 1 CONSOLE PANEL GARNISH | *14 | UPPER NO. 2 CONSOLE PANEL GARNISH |
| *15 | UPPER REAR CONSOLE PANEL | - | - |
ILLUSTRATION
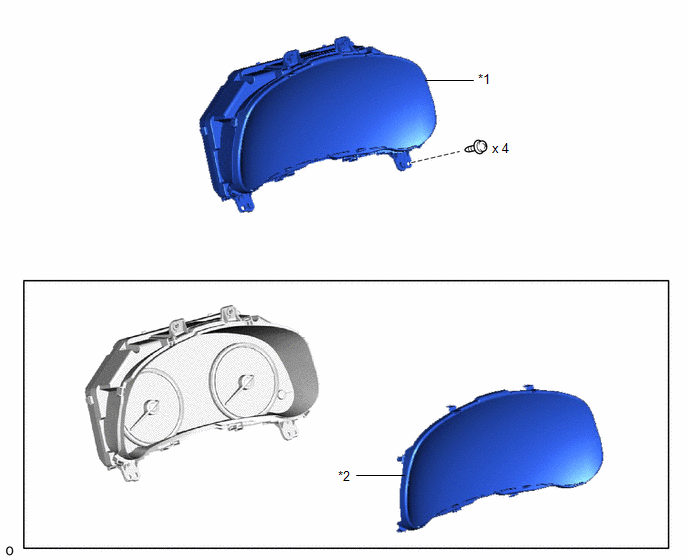
| *1 | COMBINATION METER ASSEMBLY | *2 | COMBINATION METER GLASS |
READ NEXT:
 Removal
REMOVAL CAUTION / NOTICE / HINT NOTICE: When replacing the combination meter assembly, make sure to replace it with a new one. PROCEDURE 1. DISABLE AUTOAWAY/RETURN FUNCTION (for Power Tilt and Power T
Disassembly
DISASSEMBLY CAUTION / NOTICE / HINT NOTICE: Do not allow any dirt (fingerprints, grease, etc.) to adhere to the meter glass. If the glass is dirty, wipe it clean with a soft cloth. PROCEDURE 1. REMOVE
Reassembly
REASSEMBLY CAUTION / NOTICE / HINT NOTICE: Do not allow any dirt (fingerprints, grease, etc.) to adhere to the meter glass. If the glass is dirty, wipe it clean with a soft cloth. PROCEDURE 1. INSTALL
SEE MORE:
Fold Seat Switch Circuit
DESCRIPTION When the fold seat switch is operated, a switch operation signal is sent to the fold seat control ECU. The ECU receives switch operation signals from each switch and activates the reclining motor and cushion motor. WIRING DIAGRAM PROCEDURE 1. CHECK FOLD SEAT CONTROL ECU (FOLD SEAT
Reassembly
REASSEMBLY PROCEDURE 1. INSTALL NO. 2 ANTENNA CORD SUB-ASSEMBLY Click here 2. INSTALL NO. 4 ROOF HEADLINING SUPPORT (for Normal Roof) (a) Align the No. 4 roof headlining support with the marking on the roof headlining and install the No. 4 roof headlining support using double-sided tape or hot
© 2016-2026 Copyright www.lexunx.com
