Lexus NX: Disassembly
Lexus NX Service Manual / Vehicle Interior / Meter / Gauge / Display / Combination Meter / Disassembly
DISASSEMBLY
CAUTION / NOTICE / HINT
NOTICE:
Do not allow any dirt (fingerprints, grease, etc.) to adhere to the meter glass. If the glass is dirty, wipe it clean with a soft cloth.
PROCEDURE
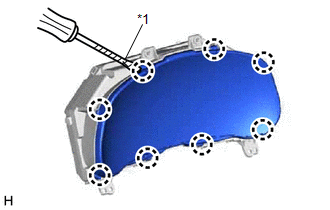
1. REMOVE COMBINATION METER GLASS
| (a) Using a screwdriver, detach the 8 claws and remove the combination meter glass. HINT: Tape the screwdriver tip before use. |
|
READ NEXT:
 Reassembly
REASSEMBLY CAUTION / NOTICE / HINT NOTICE: Do not allow any dirt (fingerprints, grease, etc.) to adhere to the meter glass. If the glass is dirty, wipe it clean with a soft cloth. PROCEDURE 1. INSTALL
Installation
INSTALLATION CAUTION / NOTICE / HINT NOTICE: When replacing the combination meter assembly, make sure to replace it with a new one. PROCEDURE 1. INSTALL COMBINATION METER ASSEMBLY (a) Connect the c
SEE MORE:
Components
COMPONENTS ILLUSTRATION *A w/ AVS - - *1 NO. 1 FLOOR UNDER COVER *2 PARKING BRAKE WIRE ASSEMBLY *3 REAR SHOCK ABSORBER ASSEMBLY LH *4 REAR TRAILING ARM ASSEMBLY LH *5 REAR SUSPENSION ARM BRACKET LH - - N*m (kgf*cm, ft.*lbf): Specified torque * For u
Disassembly
DISASSEMBLY PROCEDURE 1. PRECAUTION NOTICE:
Be sure to read Precaution thoroughly before servicing.
Click here
Handle components indoors as much as possible to prevent foreign matter from entering and adhering to fog light assembly components.
Do not reuse parts which have reduced fastening
© 2016-2026 Copyright www.lexunx.com
