Lexus NX: Reassembly
Lexus NX Service Manual / Vehicle Interior / Meter / Gauge / Display / Combination Meter / Reassembly
REASSEMBLY
CAUTION / NOTICE / HINT
NOTICE:
Do not allow any dirt (fingerprints, grease, etc.) to adhere to the meter glass. If the glass is dirty, wipe it clean with a soft cloth.
PROCEDURE
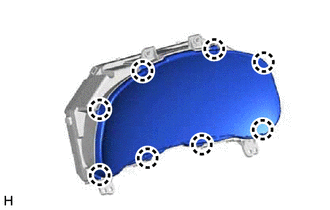
1. INSTALL COMBINATION METER GLASS
| (a) Attach the 8 claws to install the combination meter glass. |
|
READ NEXT:
 Installation
INSTALLATION CAUTION / NOTICE / HINT NOTICE: When replacing the combination meter assembly, make sure to replace it with a new one. PROCEDURE 1. INSTALL COMBINATION METER ASSEMBLY (a) Connect the c
Components
COMPONENTS ILLUSTRATION *1 DECK FLOOR BOX LH *2 NO. 3 DECK BOARD SUB-ASSEMBLY *3 REAR DECK FLOOR BOX *4 NEGATIVE AUXILIARY BATTERY TERMINAL N*m (kgf*cm, ft.*lbf): Specified
SEE MORE:
Installation
INSTALLATION PROCEDURE 1. INSTALL CONSOLE BOX ILLUMINATION LIGHT ASSEMBLY (w/ Wireless Charger) (a) Attach the 2 claws to install the console box illumination light assembly. (b) Connect the connector. 2. INSTALL REAR CONSOLE END PANEL SUB-ASSEMBLY (w/ Wireless Charger) Click here
Inspection
INSPECTION PROCEDURE 1. INSPECT FRONT CENTER ULTRASONIC SENSOR (a) Measure the resistance according to the value(s) in the table below. Standard Resistance: Tester Connection Condition Specified Condition 4 (BI) - 6 (EI) Always 10 kΩ or higher 4 (BI) - 1 (BO) Always Below
© 2016-2026 Copyright www.lexunx.com
