Lexus NX: Components
Lexus NX Service Manual / Vehicle Interior / Supplemental Restraint Systems / Rear Airbag Sensor / Components
COMPONENTS
ILLUSTRATION
.png)
| *1 | DECK FLOOR BOX LH | *2 | NO. 3 DECK BOARD SUB-ASSEMBLY |
| *3 | REAR DECK FLOOR BOX | *4 | AUXILIARY BATTERY NEGATIVE TERMINAL |
.png) | N*m (kgf*cm, ft.*lbf): Specified torque | - | - |
ILLUSTRATION
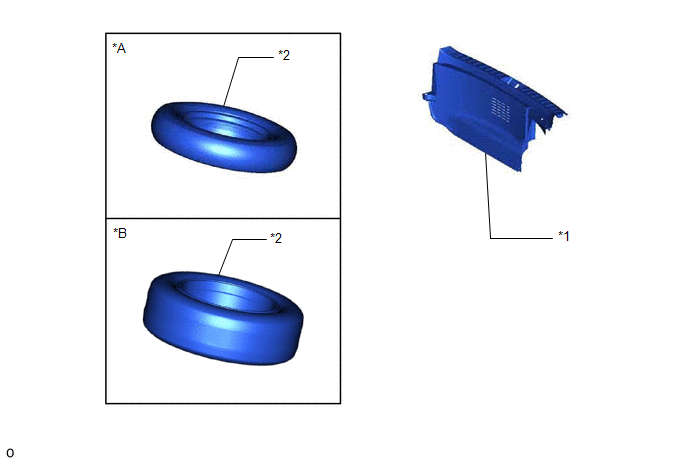
| *A | for Compact Size Spare Tire | *B | for Full Size Spare Tire |
| *1 | REAR FLOOR FINISH PLATE | *2 | SPARE TIRE |
ILLUSTRATION
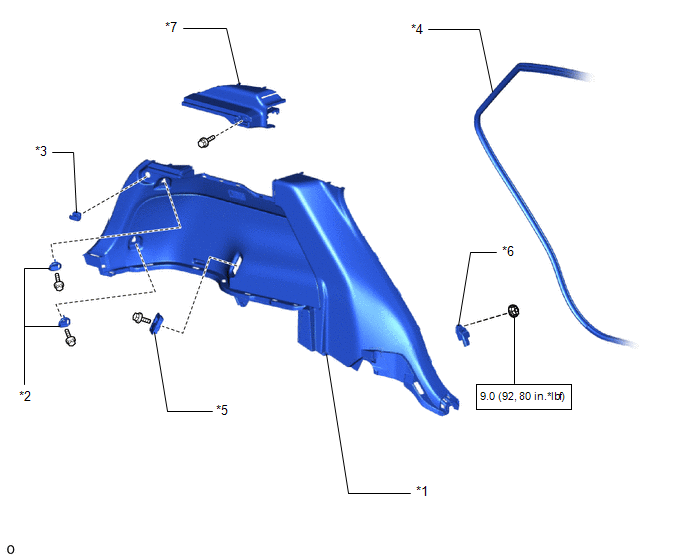
| *1 | DECK TRIM SIDE PANEL ASSEMBLY LH | *2 | LUGGAGE HOLD BELT STRIKER ASSEMBLY |
| *3 | NO. 1 LUGGAGE COMPARTMENT TRIM HOOK | *4 | REAR DOOR OPENING TRIM WEATHERSTRIP LH |
| *5 | ROPE HOOK ASSEMBLY | *6 | SIDE AIRBAG SENSOR ASSEMBLY LH |
| *7 | UPPER DECK TRIM SIDE BOARD LH | - | - |
| | N*m (kgf*cm, ft.*lbf): Specified torque | - | - |
READ NEXT:
 On-vehicle Inspection
ON-VEHICLE INSPECTION CAUTION / NOTICE / HINT CAUTION: Be sure to follow the correct removal and installation procedures of the rear airbag sensors. PROCEDURE 1. INSPECT REAR AIRBAG SENSOR (for Vehicl
Removal
REMOVAL CAUTION / NOTICE / HINT HINT:
Use the same procedure for the RH and LH sides.
The procedure listed below is for the LH side.
PROCEDURE 1. REMOVE NO. 3 DECK BOARD SUB-ASSEMBLY Click her
Installation
INSTALLATION CAUTION / NOTICE / HINT HINT:
Use the same procedure for the RH and LH sides.
The procedure listed below is for the LH side.
PROCEDURE 1. INSTALL SIDE AIRBAG SENSOR ASSEMBLY LH (a
SEE MORE:
Front Left Center Sensor (C1AE2)
DESCRIPTION The front center ultrasonic sensor (FLC sensor) is installed to the front bumper. The clearance warning ECU assembly detects obstacles based on signals received from the front center ultrasonic sensor (FLC sensor). If the front center ultrasonic sensor (FLC sensor) has an open circuit or
Removal
REMOVAL PROCEDURE 1. REMOVE NO. 1 ENGINE COVER SUB-ASSEMBLY Click here 2. REMOVE CAMSHAFT TIMING OIL CONTROL VALVE ASSEMBLY (a) Disconnect the camshaft timing oil control valve assembly connector. (b) Remove the bolt and camshaft timing oil control valve assembly from the cylinder
© 2016-2026 Copyright www.lexunx.com
