Lexus NX: Removal
REMOVAL
PROCEDURE
1. REMOVE NO. 1 ENGINE COVER SUB-ASSEMBLY
Click here .gif)
2. REMOVE CAMSHAFT TIMING OIL CONTROL VALVE ASSEMBLY
| (a) Disconnect the camshaft timing oil control valve assembly connector. |
|
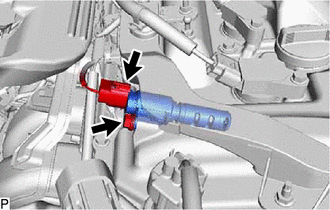
(b) Remove the bolt and camshaft timing oil control valve assembly from the cylinder head cover sub-assembly.
NOTICE:
Replace with a new part if it is dropped or if it receives a strong impact.
| (c) Remove the O-ring from the camshaft timing oil control valve assembly. HINT: An O-ring is already installed in a new camshaft timing oil control valve assembly. So, the O-ring does not need to be removed when the assembly is replaced with a new one. |
|

READ NEXT:
 Inspection
INSPECTION PROCEDURE 1. INSPECT CAMSHAFT TIMING OIL CONTROL VALVE ASSEMBLY (a) Measure the resistance according to the value(s) in the table below. Standard Resistance: Tester Connection Conditi
Installation
INSTALLATION PROCEDURE 1. INSTALL CAMSHAFT TIMING OIL CONTROL VALVE ASSEMBLY (a) Apply a light coat of engine oil to a new O-ring and install the O-ring to the camshaft timing oil control valve assemb
Camshaft Position Sensor
ComponentsCOMPONENTS ILLUSTRATION *1 CAMSHAFT POSITION SENSOR *2 NO. 1 ENGINE COVER SUB-ASSEMBLY N*m (kgf*cm, ft.*lbf) : Specified torque Toyota Genuine Adhesive 1324, Three Bon
SEE MORE:
Installation
INSTALLATION CAUTION / NOTICE / HINT NOTICE:
Do not replace the spiral cable with the battery connected and the power switch on (IG).
Do not rotate the spiral cable when the following conditions are met: 1) The steering wheel is removed, 2) the battery is connected, and 3) the power switch on (
Precaution
PRECAUTION PRECAUTION FOR SERVICING VEHICLE (a) After ECUs or parts are removed and installed, or replaced during inspection or servicing the vehicle, it is necessary to perform certain procedures (adjustment, calibration, initialization or registration). Click here PRECAUTION FOR TROUBLESHOOTING
© 2016-2026 Copyright www.lexunx.com
