Lexus NX: Components
COMPONENTS
ILLUSTRATION
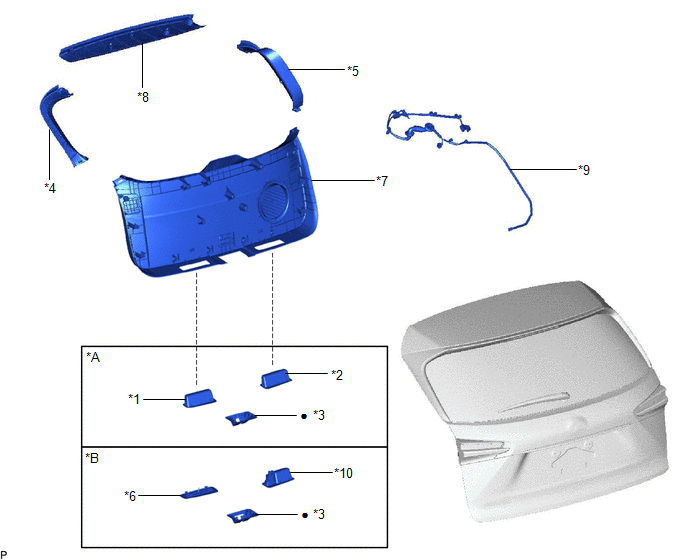
| *A | w/ Power Back Door | *B | w/o Power Back Door |
| *1 | BACK DOOR FINISH COVER LH | *2 | BACK DOOR FINISH COVER RH |
| *3 | BACK DOOR LOCK COVER | *4 | BACK DOOR SIDE GARNISH LH |
| *5 | BACK DOOR SIDE GARNISH RH | *6 | BACK DOOR TRIM BASE |
| *7 | BACK DOOR TRIM BOARD ASSEMBLY | *8 | BACK DOOR CENTER GARNISH |
| *9 | NO. 5 ANTENNA CORD SUB-ASSEMBLY | *10 | PULL HANDLE |
| ● | Non-reusable part | - | - |
READ NEXT:
 Removal
REMOVAL PROCEDURE 1. REMOVE ROOF HEADLINING ASSEMBLY Click here 2. REMOVE BACK DOOR CENTER GARNISH Click here 3. REMOVE BACK DOOR SIDE GARNISH LH Click here 4. REMOVE BACK DOOR SIDE GARNISH
Installation
INSTALLATION PROCEDURE 1. INSTALL NO. 5 ANTENNA CORD SUB-ASSEMBLY (a) Install the 2 grommets. (b) Attach the 3 clamps and install the washer hose to the clamp. (c) Connect the 4 connectors and install
SEE MORE:
Hybrid Powertrain Control Module (P0A1D-721,P0A1D-722,P0A1D-723,P0A1D-787,P0A1D-818)
DESCRIPTION The hybrid vehicle control ECU monitors its internal operation, it will store a DTC and perform fail-safe control if it detects the following malfunction. If the following DTC is output, replace the hybrid vehicle control ECU. DTC No. Detection Item DTC Detection Condition Troub
Moon roof
For comfortable cabin experience,
the ceiling (moon roof) can be
opened or tilted up.
WARNING
■Opening the moon roof
Observe the following precautions.
Failure to do so may cause death or serious
injury.
Do not allow any passengers to put
their hands or heads outside the vehicle
w
© 2016-2026 Copyright www.lexunx.com
