Lexus NX: Removal
REMOVAL
PROCEDURE
1. REMOVE ROOF HEADLINING ASSEMBLY
Click here .gif)
2. REMOVE BACK DOOR CENTER GARNISH
Click here
3. REMOVE BACK DOOR SIDE GARNISH LH
Click here
4. REMOVE BACK DOOR SIDE GARNISH RH
Click here
5. REMOVE BACK DOOR TRIM BASE (w/ Power Back Door)
Click here
6. REMOVE PULL HANDLE (w/ Power Back Door)
Click here
7. REMOVE BACK DOOR FINISH COVER LH (w/o Power Back Door)
Click here
8. REMOVE BACK DOOR FINISH COVER RH (w/o Power Back Door)
Click here
9. REMOVE BACK DOOR LOCK COVER (w/ Power Back Door)
Click here
10. REMOVE BACK DOOR LOCK COVER (w/o Power Back Door)
Click here
11. REMOVE BACK DOOR TRIM BOARD ASSEMBLY
Click here
12. REMOVE NO. 5 ANTENNA CORD SUB-ASSEMBLY
| (a) Disconnect the 4 connectors. |
|
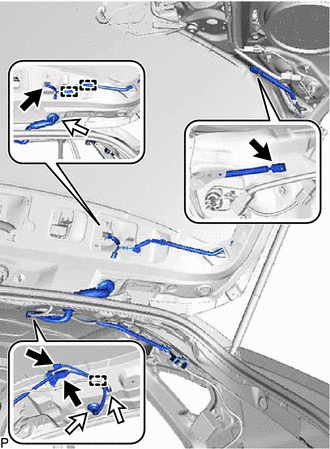
(b) Remove the washer hose from the clamp and detach the 3 clamps.
(c) Remove the 2 grommets and the No. 5 antenna cord sub-assembly.
READ NEXT:
 Installation
INSTALLATION PROCEDURE 1. INSTALL NO. 5 ANTENNA CORD SUB-ASSEMBLY (a) Install the 2 grommets. (b) Attach the 3 clamps and install the washer hose to the clamp. (c) Connect the 4 connectors and install
Components
COMPONENTS ILLUSTRATION *1 DECK FLOOR BOX LH *2 NO. 3 DECK BOARD SUB-ASSEMBLY *3 REAR DECK FLOOR BOX *4 NEGATIVE AUXILIARY BATTERY TERMINAL N*m (kgf*cm, ft.*lbf): Specified
SEE MORE:
Torque Sensor1 (C1511-C1514)
DESCRIPTION The torque sensor converts the steering wheel rotation torque into electric signals and sends them to the power steering ECU assembly. DTC No. Detection Item DTC Detection Condition Trouble Area Warning Indicate Return-to-normal Condition C1511 Torque Sensor1 Torque
Installation
INSTALLATION CAUTION / NOTICE / HINT CAUTION: Wear protective gloves. Sharp areas on the parts may injure your hands. PROCEDURE 1. INSTALL LUMBAR SUPPORT ADJUSTER ASSEMBLY LH (a) Attach the 2 hooks to install the lumbar support adjuster assembly LH to the front seatback frame sub-assembly LH. 2. INS
