Lexus NX: Components
Lexus NX Service Manual / Drivetrain / P314 (hybrid Transmission / Transaxle) / Oil Cooler / Components
COMPONENTS
ILLUSTRATION
.png)
| *1 | NO. 1 ENGINE UNDER COVER ASSEMBLY | - | - |
ILLUSTRATION
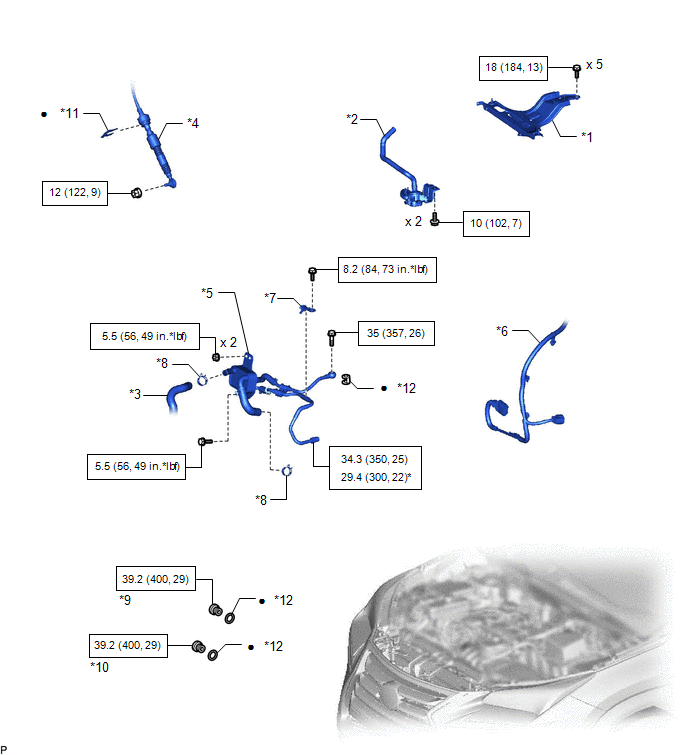
| *1 | INVERTER BRACKET ASSEMBLY | *2 | INVERTER WATER PUMP WITH MOTOR ASSEMBLY |
| *3 | NO. 5 INVERTER COOLING HOSE | *4 | TRANSMISSION CONTROL CABLE ASSEMBLY |
| *5 | TRANSMISSION OIL COOLER ASSEMBLY | *6 | WIRE HARNESS |
| *7 | NO. 1 OIL COOLER TUBE CLAMP | *8 | HOSE CLAMP |
| *9 | FILLER PLUG | *10 | DRAIN PLUG |
| *11 | CLIP | *12 | GASKET |
.png) | N*m (kgf*cm, ft.*lbf): Specified torque | * | For use with union nut wrench |
| ● | Non-reusable part | - | - |
READ NEXT:
 Removal
REMOVAL PROCEDURE 1. REMOVE NO. 1 ENGINE UNDER COVER ASSEMBLY Click here 2. REMOVE INVERTER WITH CONVERTER ASSEMBLY Click here 3. REMOVE INVERTER WATER PUMP WITH MOTOR ASSEMBLY Click here 4
Installation
INSTALLATION PROCEDURE 1. INSTALL TRANSMISSION OIL COOLER ASSEMBLY (a) Insert the stud bolts E through the transmission oil cooler assembly. *a Torque Wrench Fulcrum Length
SEE MORE:
Purge Valve
ComponentsCOMPONENTS ILLUSTRATION *1 PURGE VSV *2 FUEL VAPOR FEED HOSE *3 NO. 2 FUEL VAPOR FEED HOSE - - RemovalREMOVAL PROCEDURE 1. REMOVE PURGE VSV (a) Disconnect the wire harness clamp and connector from the purge VSV. (b) Slide the 2 clamps and disconnect
Problem Symptoms Table
PROBLEM SYMPTOMS TABLE NOTICE:
Before replacing the hybrid vehicle control ECU, refer to Registration.
Click here
When replacing the millimeter wave radar sensor assembly, always replace it with a new one. If a millimeter wave radar sensor assembly which was installed to another vehicle is us
© 2016-2026 Copyright www.lexunx.com
