Lexus NX: Removal
REMOVAL
PROCEDURE
1. REMOVE NO. 1 ENGINE UNDER COVER ASSEMBLY
Click here .gif)
2. REMOVE INVERTER WITH CONVERTER ASSEMBLY
Click here
3. REMOVE INVERTER WATER PUMP WITH MOTOR ASSEMBLY
Click here
4. REMOVE INVERTER BRACKET ASSEMBLY
Click here
5. DISCONNECT WIRE HARNESS
| (a) Disconnect the 4 clamps, 2 connectors and wire harness from the hybrid vehicle transaxle assembly. |
|
6. DISCONNECT TRANSMISSION CONTROL CABLE ASSEMBLY
Click here
7. DRAIN HYBRID TRANSAXLE FLUID
Click here
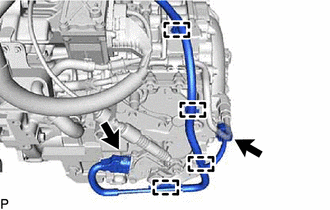
8. DISCONNECT NO. 5 INVERTER COOLING HOSE
Click here
9. REMOVE TRANSMISSION OIL COOLER ASSEMBLY
| (a) Slide the hose clamp and disconnect the transmission oil cooler assembly from the hybrid vehicle transaxle assembly. |
|
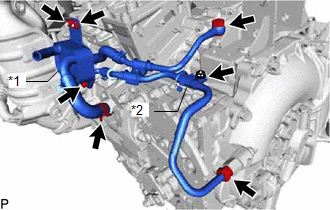
(b) Remove the 2 bolts, 2 nuts, union bolt, flare nut, gasket, No. 1 oil cooler tube clamp and transmission oil cooler assembly from the hybrid vehicle transaxle assembly.
READ NEXT:
 Installation
INSTALLATION PROCEDURE 1. INSTALL TRANSMISSION OIL COOLER ASSEMBLY (a) Insert the stud bolts E through the transmission oil cooler assembly. *a Torque Wrench Fulcrum Length
Components
COMPONENTS ILLUSTRATION *1 SHIFT LEVER ASSEMBLY *2 SHIFT LEVER CAP *3 SHIFT POSITION INDICATOR *4 SHIFTING HOLE COVER SUB-ASSEMBLY *5 TRANSMISSION CONTROL CABLE ASSEMBLY *6
SEE MORE:
Diagnostic Trouble Code Chart
DIAGNOSTIC TROUBLE CODE CHART Front Radar Sensor System DTC No. Detection Item Link C1A1100 Front Radar Sensor Optical Axis Misalignment Malfunction C1A8C46 Main Microcomputer in Front Radar Sensor Calibration/Parameter Memory Failure C1A8D1C Power Supply Circuit i
Operation Check
OPERATION CHECK CHECK WINDOW DEFOGGER SYSTEM (a) Turn the power switch on (IG). (b) Check that the rear window defogger becomes warm by operating the rear window defogger switch of the air conditioning control assembly. (c) When the vehicle is stopped, confirm that the rear window defogger stops aft
