Lexus NX: Customize Parameters
CUSTOMIZE PARAMETERS
CUSTOMIZING WITH MULTI-DISPLAY ASSEMBLY
(a) Turn the power switch on (IG).
(b) Using the multi-display assembly, select "Setup", "General", and then feedback force and change the customize setting.
| Item | Default | Content | Setting | Relevant ECU |
|---|---|---|---|---|
| Feedback Force | 2 | Setting for the level of vibration feedback reaction force of the remote touch on the touch screen* | Off, 1, 2 or 3 | Radio receiver assembly |
| NO VIBRATION/LEVEL1/LEVEL2/LEVEL3 |
HINT:
*: The higher the set value, the stronger the touch screen vibration feedback reaction force becomes.
(c) Using the multi-display assembly, select "Setup", "General", and then cursor speed and change the customize setting.
| Item | Default | Content | Setting | Relevant ECU |
|---|---|---|---|---|
| Cursor speed | Normal | Setting for the speed at which the pointer/cursor moves when the touch screen is touched with a finger | Slow, Normal, or Fast | Radio receiver assembly |
| SLOW/NORMAL/FAST |
(d) Using the multi-display assembly, select "Setup", "General", and then multi-touch command and change the customize setting.
| Item | Default | Content | Setting | Relevant ECU |
|---|---|---|---|---|
| Multi-touch command | On | Enable/disable 2-finger cursor operation function | ON, OFF | Radio receiver assembly |
| ON/OFF |
(e) Using the multi-display assembly, select "Setup", "Navi", and then map flick and change the customize setting.
| Item | Default | Content | Setting | Relevant ECU |
|---|---|---|---|---|
| Map Flick | Off | Flick operation setting for full screen map display mode | ON, OFF | Radio receiver assembly |
| ON/OFF |
CUSTOMIZING WITH REMOTE TOUCH
(a) Customizing with the touch function cancellation function. (w/ Touch Function Cancellation Function)
NOTICE:
Confirm the touchpad surface is free of foreign matter before customizing.
(1) Turn the power switch on (ACC).
(2) Simultaneously press and hold the "MAP" switch and "BACK" switch for 5 seconds or more.
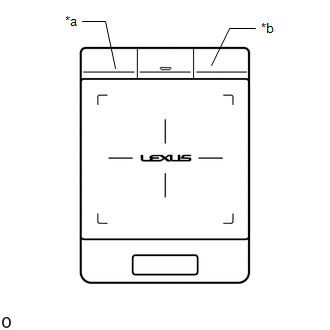
| *a | "MAP" Switch |
| *b | "BACK" Switch |
(3) While pressing and holding the "MAP" switch and "BACK" switch, tap the touchpad with 2 fingers.
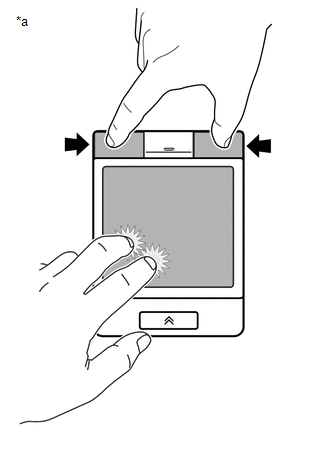
| *a | Example |
HINT:
- If any switch other than the "MAP" switch or "BACK" switch is pressed, the customize setting cannot be changed.
- Do not pinch in/out or slide fingers when tapping the touchpad with 2 fingers.
(4) Confirm that the answer-back function vibrates the touchpad a specified number of times to indicate that the setting has changed.
Setting| Touch Function Cancellation Function | Number of Answer Back Vibrations |
|---|---|
| Off (Default) | 1 |
| On | 2 |
(5) Repeat step (3) until the desired setting is selected.
HINT:
The touch function cancellation function alternates between on and off.
(6) Release the "MAP" switch and "BACK" switch to select the set value.
READ NEXT:
 Problem Symptoms Table
PROBLEM SYMPTOMS TABLE NOTICE: When replacing the radio receiver assembly or navigation ECU, always replace it with a new one. If a radio receiver assembly or navigation ECU which was installed to ano
Terminals Of Ecu
TERMINALS OF ECU Terminal No. (Symbol) Wiring Color Terminal Description Condition Specified Condition
*1: w/ Manual (SOS) Switch
*2: It is connected, but not used *3: w/o Manual (SOS)
Dtc Check / Clear
DTC CHECK / CLEAR CHECK DTC (CHECK USING Techstream) (a) Connect the Techstream to the DLC3. (b) Turn the power switch on (IG) and wait for 90 seconds. (c) Turn the Techstream on. (d) Enter the follow
SEE MORE:
How To Proceed With Troubleshooting
CAUTION / NOTICE / HINT PRECAUTIONS WHEN TROUBLESHOOTING NOTICE:
Because the order of diagnosis is important to allow correct diagnosis, make sure to begin troubleshooting using How to Proceed with Troubleshooting when CAN communication system related DTCs are output.
If the CAN communication s
Problem Symptoms Table
PROBLEM SYMPTOMS TABLE NOTICE:
Recognition code registration is necessary when replacing the main body ECU (multiplex network body ECU).
If the main body ECU (multiplex network body ECU) is replaced, refer to Registration.
Click here HINT:
Use the table below to help determine the cau
