Lexus NX: Inside rear view mirror
The rear view mirror's position can be adjusted to enable sufficient confirmation of the rear view.
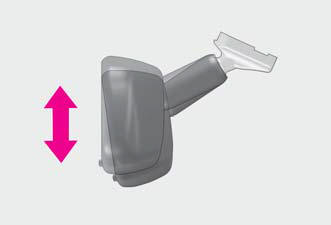
Adjusting the height of rear view mirror
The height of the rear view mirror can be adjusted to suit your driving posture.
Adjust the height of the rear view mirror by moving it up and down.
WARNING
■Caution while driving Do not adjust the position of the mirror while driving.
Doing so may lead to mishandling of the vehicle and cause an accident, resulting in death or serious injury.
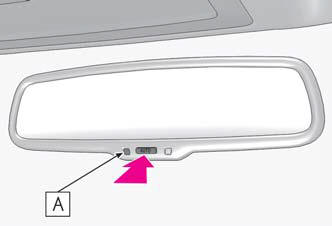
Anti-glare function
Responding to the level of brightness of the headlights of vehicles behind, the reflected light is automatically reduced.
Type A
Changing automatic anti-glare function mode on/off
When the automatic anti-glare function is in ON mode, the indicator A illuminates.
The function will set to ON mode each time the power switch is turned to ON mode.
Pressing the button turns the function to OFF mode. (The indicator A also turns off.)
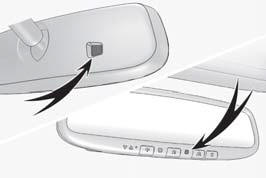
Type B
Changing automatic anti-glare function mode on/off
When the automatic anti-glare function is in ON mode, the indicator A illuminates.
The function will set to ON mode each time the power switch is turned to ON mode.
Pressing the button turns the function to OFF mode. (The indicator A also turns off.)

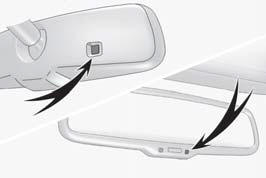
■To prevent sensor error To ensure that the sensors operate properly, do not touch or cover them.
Type A
Type B
READ NEXT:
 Outside rear view mirrors
For safe driving, adjust the mirror
angles to secure visibility before
driving.
WARNING
■When driving the vehicle
Observe the following precautions while
driving.
Failure to do so may resul
Power windows
Opening and closing the power
windows
The power windows can be opened
and closed by a one-touch operation of
the switches.
Closing
One-touch closing*
Opening
One-touch opening*
*: T
SEE MORE:
Lost Communication with Tilt & (U1115)
DESCRIPTION DTC No. Detection Item DTC Detection Condition Trouble Area DTC Output from U1115 Lost Communication with Tilt & Telescopic Module There is no communication from the multiplex tilt and telescopic ECU.
Power source circuit of multiplex tilt and telescopic ECU
Front Door Opening Trim Weatherstrip
ComponentsCOMPONENTS ILLUSTRATION *1 DOOR SCUFF PLATE ASSEMBLY LH *2 FRONT DOOR OPENING TRIM WEATHERSTRIP LH RemovalREMOVAL CAUTION / NOTICE / HINT HINT:
Use the same procedure for the RH and LH side.
The procedure listed below is for the LH side.
PROCEDURE 1. REMOVE DOOR SCUF
