Lexus NX: Inspection
INSPECTION
PROCEDURE
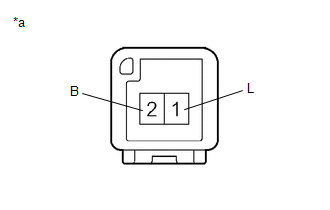
1. INSPECT GLOVE BOX LIGHT ASSEMBLY
| (a) Apply battery voltage to the connector and check the light illumination condition. OK:
If the result is not as specified, replace the glove box light assembly. |
|
READ NEXT:
 Installation
INSTALLATION PROCEDURE 1. INSTALL GLOVE BOX LIGHT ASSEMBLY (a) Attach the 2 claws to install the glove box light assembly. 2. INSTALL LOWER INSTRUMENT PANEL SUB-ASSEMBLY Click here 3.
Parts Location
PARTS LOCATION ILLUSTRATION *1 MAP LIGHT ASSEMBLY *2 SPOT LIGHT ASSEMBLY *3 VISOR ASSEMBLY RH *4 VISOR ASSEMBLY LH *5 VANITY LIGHT ASSEMBLY RH *6 VANITY LIGHT ASSEMBLY LH
SEE MORE:
Interior Light Auto Cut Circuit
DESCRIPTION The main body ECU (multiplex network body ECU) controls the DOME CUT relay. WIRING DIAGRAM CAUTION / NOTICE / HINT NOTICE:
Inspect the fuses for circuits related to this system before performing the following procedure.
Recognition code registration is necessary when replacing the
Registration
REGISTRATION PROCEDURE 1. INSTALL CAUTION REGARDING INTERFERENCE WITH ELECTRONIC DEVICES CAUTION:
People with implantable cardiac pacemakers, cardiac resynchronization therapy-pacemakers or implantable cardioverter defibrillators should keep away from the smart key system antennas. The radio wave
© 2016-2026 Copyright www.lexunx.com
