Lexus NX: Installation
INSTALLATION
CAUTION / NOTICE / HINT
CAUTION:
Wear protective gloves. Sharp areas on the parts may injure your hands.
PROCEDURE
1. INSTALL SEAT POSITION AIRBAG SENSOR
| (a) Align the adjustment support and set the seat position airbag sensor into place. |
|
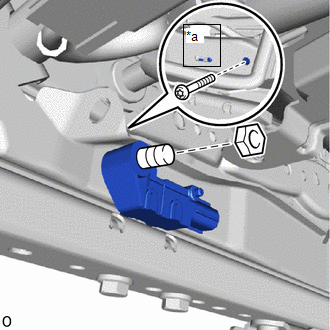
(b) Using a T30 "TORX" socket wrench, temporarily install the seat position airbag sensor with a new "TORX" bolt and nut.
NOTICE:
- If the seat position airbag sensor has been dropped, or there are any cracks, dents or other defects in the case or connector, replace the seat position airbag sensor with a new one.
- When installing the seat position airbag sensor, be careful that the SRS wiring does not interfere with or is pinched between other parts.
HINT:
Temporarily install the seat position airbag sensor so that the sensor does not fall off of the adjustment support.
(c) Insert a 1.3 mm (0.0512 in.) feeler gauge between the seat position airbag sensor and seat rail.
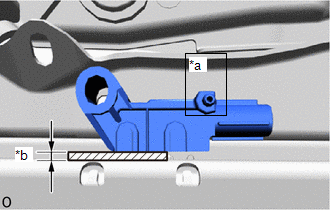
| *a | Adjustment Support |
| *b | 1.3 mm (0.0512 in.) |
.png) | Feeler Gauge |
(d) Move the seat position airbag sensor up and down to adjust the clearance between it and the seat rail.
HINT:
- Using the adjustment support as an axis, move the seat position vertically to adjust the gap.
- Move the feeler gauge back and forth and adjust the position of the seat position airbag sensor so that a small amount of resistance can be felt.
(e) Using a T30 "TORX" socket wrench, tighten the "TORX" bolt and nut.
Torque:
8.0 N·m {82 kgf·cm, 71 in·lbf}
(f) Pull out the feeler gauge.
(g) Check the clearance between the seat position airbag sensor and seat rail.
OK:
0.6 mm (0.0236 in.) to 2.0 mm (0.0787 in.)
(h) Attach the 2 wire harness clamps.
(i) Connect the connector.
(j) Check that there is no looseness in the installation parts of the seat position airbag sensor.
| (k) Slide the tab of the seat slide position sensor protector between the seat position airbag sensor and seat rail. |
|
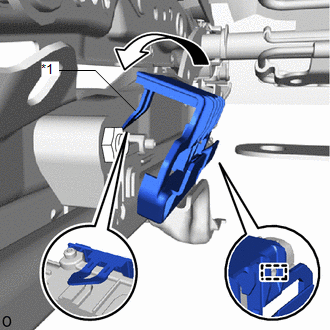
(l) Attach the guide to install the seat slide position sensor protector.
2. INSTALL SEAT HEATER CONTROL SUB-ASSEMBLY LH (w/ Seat Heater System)
Click here .gif)
3. INSTALL FRONT SEAT ASSEMBLY LH
Click here
4. CONNECT CABLE TO NEGATIVE AUXILIARY BATTERY TERMINAL
(a) Connect the cable to the negative (-) auxiliary battery terminal and tighten the nut.
Torque:
5.4 N·m {55 kgf·cm, 48 in·lbf}
5. INITIALIZATION AFTER RECONNECTING AUXILIARY BATTERY TERMINAL
Click here
HINT:
When disconnecting and reconnecting the auxiliary battery, there is an automatic learning function that completes learning when the respective system is used.
Click here
6. INSTALL DECK FLOOR BOX LH
Click here
7. INSTALL REAR DECK FLOOR BOX
Click here
8. INSTALL NO. 3 DECK BOARD SUB-ASSEMBLY
Click here
9. PERFORM DIAGNOSTIC SYSTEM CHECK
Click here
10. CHECK SRS WARNING LIGHT
Click here
READ NEXT:
 Components
COMPONENTS ILLUSTRATION *1 DECK FLOOR BOX LH *2 NO. 3 DECK BOARD SUB-ASSEMBLY *3 REAR DECK FLOOR BOX *4 AUXILIARY BATTERY NEGATIVE TERMINAL N*m (kgf*cm, ft.*lbf): Specified
On-vehicle Inspection
ON-VEHICLE INSPECTION CAUTION / NOTICE / HINT CAUTION: Be sure to follow the correct removal and installation procedures of the door side airbag sensors. PROCEDURE 1. INSPECT DOOR SIDE AIRBAG SENSOR (
SEE MORE:
On-vehicle Inspection
ON-VEHICLE INSPECTION PROCEDURE 1. CHECK STEERING EFFORT (TORQUE) CAUTION: These service operations may affect the SRS airbags. Be sure to read the precautionary notices concerning the SRS airbag system before servicing. Click here (a) Stop the vehicle on a level, paved surface and align the whee
Warning lights and indicators
The warning lights and indicators inform the driver of the status of
the vehicle's
various systems.
Instrument cluster
For the purpose of explanation, the following illustration displays all
warning lights
and indicators illuminated.
The units used on the meter and some indicators may dif
