Lexus NX: Components
Lexus NX Service Manual / Vehicle Interior / Supplemental Restraint Systems / Side Airbag Sensor / Components
COMPONENTS
ILLUSTRATION
.png)
| *1 | DECK FLOOR BOX LH | *2 | NO. 3 DECK BOARD SUB-ASSEMBLY |
| *3 | REAR DECK FLOOR BOX | *4 | AUXILIARY BATTERY NEGATIVE TERMINAL |
.png) | N*m (kgf*cm, ft.*lbf): Specified torque | - | - |
ILLUSTRATION
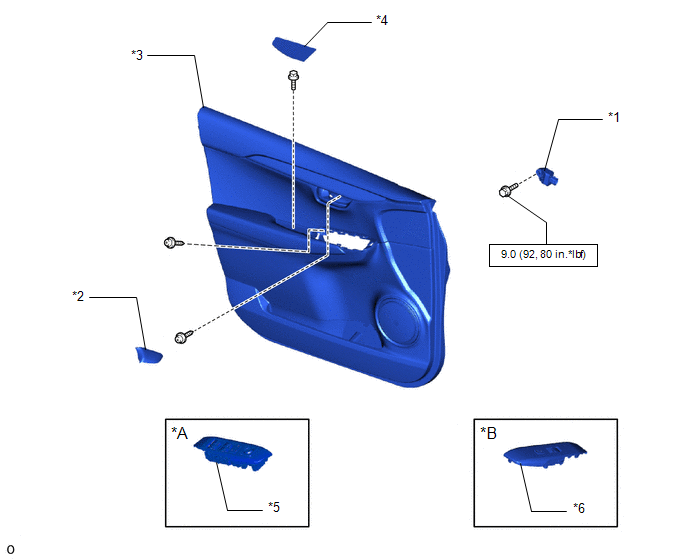
| *A | for Driver Side | *B | for Front Passenger Side |
| *1 | DOOR SIDE AIRBAG SENSOR LH | *2 | FRONT DOOR INSIDE HANDLE BEZEL PLUG LH |
| *3 | FRONT DOOR TRIM BOARD SUB-ASSEMBLY LH | *4 | FRONT DOOR TRIM COVER LH |
| *5 | POWER WINDOW REGULATOR MASTER SWITCH ASSEMBLY WITH FRONT DOOR ARMREST BASE PANEL | *6 | POWER WINDOW REGULATOR SWITCH ASSEMBLY WITH FRONT DOOR ARMREST BASE PANEL |
| | N*m (kgf*cm, ft.*lbf): Specified torque | - | - |
READ NEXT:
 On-vehicle Inspection
ON-VEHICLE INSPECTION CAUTION / NOTICE / HINT CAUTION: Be sure to follow the correct removal and installation procedures of the door side airbag sensors. PROCEDURE 1. INSPECT DOOR SIDE AIRBAG SENSOR (
Removal
REMOVAL CAUTION / NOTICE / HINT HINT:
Use the same procedure for the RH and LH sides.
The procedure listed below is for the LH side.
PROCEDURE 1. REMOVE NO. 3 DECK BOARD SUB-ASSEMBLY Click her
Installation
INSTALLATION CAUTION / NOTICE / HINT HINT:
Use the same procedure for the RH and LH sides.
The procedure listed below is for the LH side.
PROCEDURE 1. INSTALL DOOR SIDE AIRBAG SENSOR LH (a) Ch
SEE MORE:
Internal Control Module Throttle Position Performance (P060E)
MONITOR DESCRIPTION The ECM monitors the signals received from the No. 1 throttle position sensor and stop light switch assembly. As the ECM monitors the STP signal of the stop light switch assembly and the No. 1 throttle position sensor, if these signals do not correlate, this DTC is stored. DTC
Id Code Box
ComponentsCOMPONENTS ILLUSTRATION *1 AIR CONDITIONER UNIT ASSEMBLY *2 ID CODE BOX (IMMOBILIZER CODE ECU) InstallationINSTALLATION PROCEDURE 1. INSTALL ID CODE BOX (IMMOBILIZER CODE ECU) (a) Attach the 2 guides. (b) Attach the claw as shown in the illustration to install the ID code bo
© 2016-2026 Copyright www.lexunx.com
