Lexus NX: Installation
INSTALLATION
PROCEDURE
1. INSTALL NAVIGATION ANTENNA ASSEMBLY
2. INSTALL NAVIGATION ANTENNA BRACKET
| (a) Attach the 4 guides to install the navigation antenna assembly as shown in the illustration. |
|
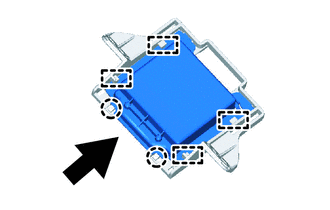
(b) Attach the 2 claws to install the navigation antenna assembly.
3. INSTALL ANTENNA CORD SUB-ASSEMBLY
(a) Connect the connector.
(b) Attach the 4 claws to install the antenna cord sub-assembly.
4. INSTALL NAVIGATION ANTENNA ASSEMBLY WITH BRACKET
(a) Install the navigation antenna assembly with bracket with the 2 screws.
(b) Attach the 2 clamps.
5. INSTALL NO. 1 HEATER TO REGISTER DUCT SUB-ASSEMBLY
Click here .gif)
6. INSTALL UPPER INSTRUMENT PANEL SUB-ASSEMBLY
Click here
READ NEXT:
 Navigation Ecu
ComponentsCOMPONENTS ILLUSTRATION *1 NAVIGATION ECU *2 NO. 1 RADIO BRACKET *3 NO. 2 RADIO BRACKET *4 RADIO RECEIVER ASSEMBLY WITH BRACKET *5 NAVIGATION WIRE - - Remo
Precaution
PRECAUTION PRECAUTION FOR DISCONNECTING CABLE FROM NEGATIVE AUXILIARY BATTERY TERMINAL NOTICE: After the power switch is turned off, the radio receiver assembly records various types of memory and set
SEE MORE:
Removal
REMOVAL CAUTION / NOTICE / HINT HINT:
Use the same procedure for the RH and LH sides.
The procedure listed below is for the LH side.
PROCEDURE 1. REMOVE REAR WHEEL Click here 2. DISCONNECT REAR SPEED SENSOR LH (a) w/ AVS: Click here (b) w/o AVS: Click here 3. DISCONNECT PARKING BRAKE W
Precaution
PRECAUTION PRECAUTION FOR DISCONNECTING CABLE FROM NEGATIVE AUXILIARY BATTERY TERMINAL NOTICE:
After the power switch is turned off, there may be a waiting time before disconnecting the negative (-) auxiliary battery terminal.
Click here
When disconnecting and reconnecting the auxiliary batte
© 2016-2026 Copyright www.lexunx.com
