
Lexus NX: Removal
REMOVAL
PROCEDURE
1. RECOVER REFRIGERANT FROM REFRIGERATION SYSTEM
Click here .gif)
2. REMOVE RADIATOR ASSEMBLY
Click here
3. REMOVE FRONT BUMPER COVER
(a) for Sport Package:
Click here
(b) except Sport Package:
Click here
4. DISCONNECT DISCHARGE HOSE SUB-ASSEMBLY
| (a) Remove the bolt and disconnect the discharge hose sub-assembly. |
|
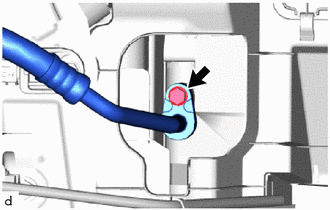
(b) Remove the O-ring from the discharge hose sub-assembly.
NOTICE:
Seal the openings of the disconnected parts using vinyl tape to prevent entry of moisture and foreign matter.
5. DISCONNECT LIQUID PIPE SUB-ASSEMBLY
| (a) Remove the bolt and disconnect the liquid pipe sub-assembly. |
|
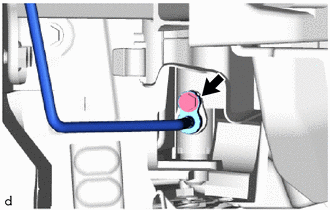
(b) Remove the O-ring from the liquid pipe sub-assembly.
NOTICE:
Seal the openings of the disconnected parts using vinyl tape to prevent entry of moisture and foreign matter.
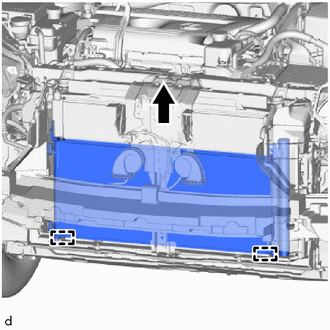
6. REMOVE COOLER CONDENSER ASSEMBLY
| (a) Detach the 2 guides and remove the cooler condenser assembly. NOTICE: Do not damage the cooler condenser assembly or radiator assembly when removing the cooler condenser assembly. |
|
READ NEXT:
 Disassembly
DISASSEMBLY PROCEDURE 1. REMOVE NO. 1 COOLER CONDENSER CUSHION (a) Remove the 2 No. 1 cooler condenser cushions from the cooler condenser assembly. 2. REMOVE COOLER DRYER (a) Using a
Reassembly
REASSEMBLY PROCEDURE 1. INSTALL COOLER DRYER (a) Using pliers, install a new cooler dryer to the modulator. *1 Modulator (b) Apply sufficient compressor oil to the O-ring
Installation
INSTALLATION PROCEDURE 1. INSTALL COOLER CONDENSER ASSEMBLY (a) Attach the 2 guides to install the cooler condenser assembly. NOTICE: Do not damage the cooler condenser assembly or radiator assembl
SEE MORE:
Components
COMPONENTS ILLUSTRATION *1 CONSOLE ARMREST ASSEMBLY *2 COOLER THERMISTOR (ROOM TEMPERATURE SENSOR) *3 COWL SIDE TRIM BOARD LH *4 DOOR SCUFF PLATE ASSEMBLY LH *5 INSTRUMENT SIDE PANEL LH *6 LOWER NO. 1 INSTRUMENT PANEL FINISH PANEL *7 UPPER NO. 1 CONSOLE PANEL GARN
Lost Communication with Body Control Module Missing Message (U014087,U015587,U016387)
DESCRIPTION These DTCs are stored when a malfunction occurs in the CAN communication circuit. DTC No. Detection Item DTC Detection Condition Trouble Area U014087 Lost Communication with Body Control Module Missing Message CAN reception error CAN communication system U015587
