Lexus NX: Reassembly
Lexus NX Service Manual / Vehicle Interior / Interior Panels / Trim / Lower Instrument Panel / Reassembly
REASSEMBLY
PROCEDURE
1. INSTALL GLOVE COMPARTMENT DOOR LOCK CYLINDER ASSEMBLY
(a) With the cylinder lock pressed, insert the glove compartment door lock cylinder assembly into the glove compartment door assembly to install it as shown in the illustration.
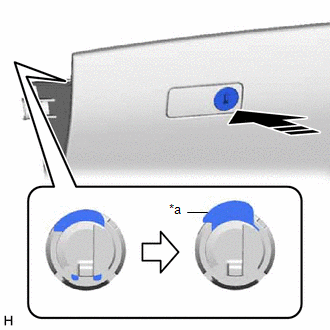
| *a | Cylinder Lock |
.png) | Install in this Direction |
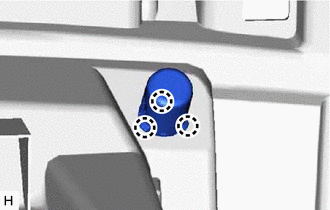
2. INSTALL GLOVE BOX LIGHT ASSEMBLY
Click here .gif)
3. INSTALL GLOVE COMPARTMENT DOOR CHECK CUSHION
HINT:
Use the same procedure for both glove compartment door check cushions.
| (a) Attach the 3 claws to install the glove compartment door check cushions. |
|
READ NEXT:
 Installation
INSTALLATION CAUTION / NOTICE / HINT HINT: A bolt without a torque specification is shown in the standard bolt chart. Click here PROCEDURE 1. INSTALL LOWER INSTRUMENT PANEL SUB-ASSEMBLY (a) Cut off
Components
COMPONENTS ILLUSTRATION *1 DECK BOARD ASSEMBLY *2 DECK FLOOR BOX LH *3 NO. 3 DECK BOARD SUB-ASSEMBLY *4 REAR DECK FLOOR BOX *5 NEGATIVE AUXILIARY BATTERY TERMINAL - -
SEE MORE:
Evaporative Emission Control System Incorrect Purge Flow (P0441)
DTC SUMMARY DTC No. Detection Item DTC Detection Condition Trouble Area MIL Memory P0441 Evaporative Emission Control System Incorrect Purge Flow One of the following conditions met:
Leak detection pump creates negative pressure (vacuum) in EVAP system and EVAP system pressur
Adjustment
ADJUSTMENT CAUTION / NOTICE / HINT HINT:
Use the same procedure for the RH and LH sides.
The procedure listed below is for the LH side.
It is possible that a headlight assembly is incorrectly installed, affecting headlight aim. Headlight assembly installation should be considered prior to per
© 2016-2026 Copyright www.lexunx.com
