Lexus NX: Removal
REMOVAL
PROCEDURE
1. REMOVE POWER WINDOW REGULATOR MASTER SWITCH ASSEMBLY WITH FRONT DOOR ARMREST BASE PANEL
Click here .gif)
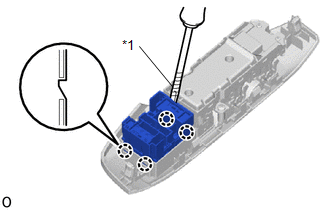
2. REMOVE OUTER MIRROR SWITCH ASSEMBLY
| (a) Using a precision screwdriver, detach the 4 claws and remove the outer mirror switch assembly. HINT: Tape the precision screwdriver tip before use. |
|
READ NEXT:
 Inspection
INSPECTION PROCEDURE 1. INSPECT OUTER MIRROR SWITCH ASSEMBLY (w/ Memory) (a) Check the mirror retract switch. (1) Measure the resistance according to the value(s) in the table below. Standard Resis
Installation
INSTALLATION PROCEDURE 1. INSTALL OUTER MIRROR SWITCH ASSEMBLY (a) Attach the 4 claws and install the outer mirror switch assembly. 2. INSTALL POWER WINDOW REGULATOR MASTER SWITCH ASSEMBLY WITH FRONT
SEE MORE:
DC / DC Converter Performance (P0A94-553)
DTC SUMMARY MALFUNCTION DESCRIPTION This DTC indicates when the temperature of the boost converter has become abnormal. The cause of this malfunction may be one of the following: Area Main Malfunction Description Step Inverter low-voltage circuit The connectors are not connected properl
Actuator Supply Voltage Circuit / Open (P0657)
MONITOR DESCRIPTION The ECM monitors the output voltage to the throttle actuator. This self-check ensures that the ECM is functioning properly. The output voltage is usually 0 V when the power switch is turned off. If the output voltage is higher than 7 V when the power switch is turned off, the ECM
© 2016-2026 Copyright www.lexunx.com
