Lexus NX: Removal
REMOVAL
CAUTION / NOTICE / HINT
HINT:
- Use the same procedure for the RH and LH sides.
- The procedure listed below is for the LH side.
PROCEDURE
1. REMOVE REAR DOOR TRIM COVER LH
Click here .gif)
2. REMOVE REAR DOOR INSIDE HANDLE BEZEL PLUG LH
Click here
3. REMOVE REAR POWER WINDOW REGULATOR SWITCH ASSEMBLY WITH REAR DOOR ARMREST BASE PANEL
Click here
4. REMOVE REAR DOOR TRIM BOARD SUB-ASSEMBLY LH
Click here
5. REMOVE REAR SPEAKER ASSEMBLY
NOTICE:
Do not touch the cone part of the speaker.
| (a) Connect the connector. |
|
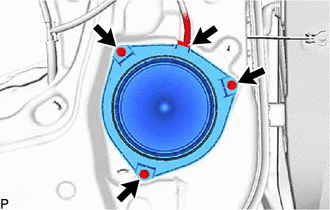
(b) Remove the 3 screws and rear speaker assembly.
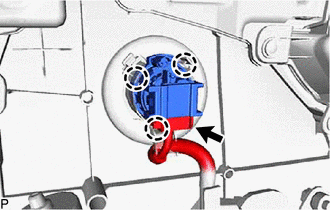
6. REMOVE REAR NO. 2 SPEAKER ASSEMBLY
NOTICE:
Do not touch the cone part of the speaker.
| (a) Detach the 3 claws and remove the rear No. 2 speaker assembly. |
|
READ NEXT:
 Inspection
INSPECTION PROCEDURE 1. INSPECT REAR SPEAKER ASSEMBLY (a) Measure the resistance according to the value(s) in the table below. Standard Resistance: for 8 Speakers Tester Connection Condition
Installation
INSTALLATION CAUTION / NOTICE / HINT HINT:
Use the same procedure for the RH and LH sides.
The procedure listed below is for the LH side.
PROCEDURE 1. INSTALL REAR NO. 2 SPEAKER ASSEMBLY NOTIC
SEE MORE:
Diagnostic Trouble Code Chart
DIAGNOSTIC TROUBLE CODE CHART Power Tilt and Power Telescopic Steering Column System DTC No. Detection Item DTC Detection Condition Link B2603 Tilt and Telescopic Manual Switch Circuit Malfunction When operating the tilt and telescopic switch, an abnormal voltage value is sent to th
Cruise Main Indicator Light Circuit
DESCRIPTION When the dynamic radar cruise control system is turned on using the cruise control main switch, the cruise control indicator (vehicle-to-vehicle distance control mode) illuminates. The hybrid vehicle control ECU uses this and other indicators to indicate the status (presence or absence o
© 2016-2026 Copyright www.lexunx.com
