Lexus NX: Installation
INSTALLATION
CAUTION / NOTICE / HINT
HINT:
- Use the same procedure for the RH and LH sides.
- The procedure listed below is for the LH side.
PROCEDURE
1. INSTALL REAR NO. 2 SPEAKER ASSEMBLY
NOTICE:
Do not touch the cone part of the speaker.
(a) Attach the 3 claws to install the rear No. 2 speaker assembly.
2. INSTALL REAR SPEAKER ASSEMBLY
NOTICE:
Do not touch the cone part of the speaker.
| (a) Temporarily install the speaker by attaching the claw of the speaker to the door panel. |
|
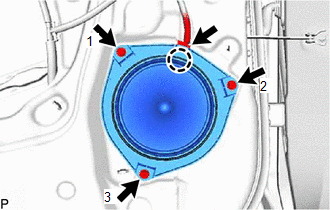
(b) Install the rear speaker assembly with the 3 screws.
HINT:
Tighten the screws in the order shown in the illustration.
(c) Connect the connector.
3. INSTALL REAR DOOR TRIM BOARD SUB-ASSEMBLY LH
Click here .gif)
4. INSTALL REAR POWER WINDOW REGULATOR SWITCH ASSEMBLY WITH REAR DOOR ARMREST BASE PANEL
Click here
5. INSTALL REAR DOOR INSIDE HANDLE BEZEL PLUG LH
Click here
6. INSTALL REAR DOOR TRIM COVER LH
Click here
READ NEXT:
 Removal
REMOVAL PROCEDURE 1. REMOVE REAR SEAT ASSEMBLY (for Manual Seat) Click here 2. REMOVE REAR SEAT ASSEMBLY (for Power Seat) Click here 3. REMOVE TONNEAU COVER ASSEMBLY Click here 4. REMOVE DECK BO
Installation
INSTALLATION CAUTION / NOTICE / HINT HINT: A bolt without a torque specification is shown in the standard bolt chart. Click here PROCEDURE 1. INSTALL STEREO COMPONENT AMPLIFIER ASSEMBLY 2. INSTALL N
SEE MORE:
Display Disconnected (B15D6)
DESCRIPTION The multi-display assembly and radio receiver assembly are connected by the AVC-LAN communication line. This DTC is stored when an AVC-LAN communication error occurs between the multi-display assembly and radio receiver assembly. DTC No. Detection Item DTC Detection Condition Tr
Removal
REMOVAL PROCEDURE 1. REMOVE DECK BOARD ASSEMBLY Click here 2. REMOVE NO. 3 DECK BOARD SUB-ASSEMBLY Click here 3. REMOVE REAR DECK FLOOR BOX Click here 4. REMOVE DECK FLOOR BOX LH Click here 5. PRECAUTION CAUTION: Be sure to read Precaution thoroughly before serving. Click here NOTICE: Afte
