
Lexus NX: Removal
REMOVAL
PROCEDURE
1. DRAIN ENGINE COOLANT
Click here .gif)
2. REMOVE FAN AND GENERATOR V BELT
Click here
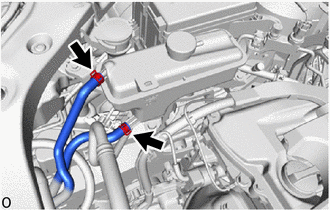
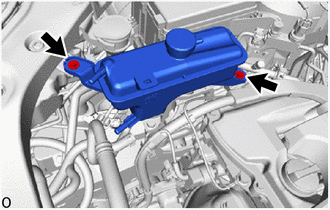
3. REMOVE RADIATOR RESERVE TANK ASSEMBLY
| (a) Slide the 2 clamps and disconnect the water by-pass hose and No. 2 water by-pass hose from the radiator reserve tank assembly. |
|
| (b) Remove the 2 bolts and radiator reserve tank assembly. |
|
4. REMOVE V-RIBBED BELT TENSIONER ASSEMBLY
Click here
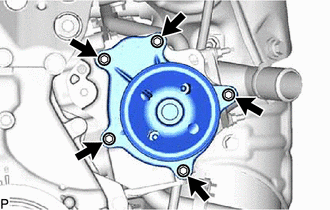
5. REMOVE ENGINE WATER PUMP ASSEMBLY
| (a) Remove the 5 bolts, engine water pump assembly and gasket. |
|
READ NEXT:
 Installation
INSTALLATION PROCEDURE 1. INSTALL ENGINE WATER PUMP ASSEMBLY (a) Install a new gasket and the engine water pump assembly with the 5 bolts in the order shown in the illustration. Torque: 10 N·m {1
SEE MORE:
Climate Control System does not Operate on Passenger Side
DESCRIPTION The air conditioning control assembly sends operation signals to the air conditioning amplifier assembly via the LIN communication line. The air conditioning amplifier assembly actives the seat blowers according to these signals. WIRING DIAGRAM CAUTION / NOTICE / HINT NOTICE:
The cli
Installation
INSTALLATION PROCEDURE 1. INSTALL BACK DOOR OPENER SWITCH ASSEMBLY (a) Connect the connector. (b) Install the back door opener switch assembly. 2. INSTALL BACK DOOR OUTSIDE GARNISH SUB-ASSEMBLY Click here 3. INSTALL BACK DOOR TRIM BOARD ASSEMBLY Click here 4. INSTALL BACK DOOR LOCK COVER (w/ P
© 2016-2026 Copyright www.lexunx.com
