Lexus NX: Replacement
REPLACEMENT
PROCEDURE
1. REPLACE HYBRID TRANSAXLE FLUID
(a) Be sure that the vehicle remains level and lift the vehicle. [*1]
(b) Remove the No. 1 engine under cover assembly.
Click here .gif)
| (c) Using a 10 mm hexagon socket wrench, remove the filler plug and gasket from the hybrid vehicle transaxle assembly. [*2] |
|
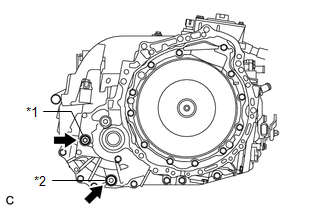
(d) Using a 10 mm hexagon socket wrench, remove the drain plug and gasket to drain the hybrid transaxle fluid. [*3]
(e) Using a 10 mm hexagon socket wrench, temporarily install the drain plug and gasket to the hybrid vehicle transaxle assembly. [*4]
HINT:
Because the drain plug will be removed again, the gasket can be reused at this time.
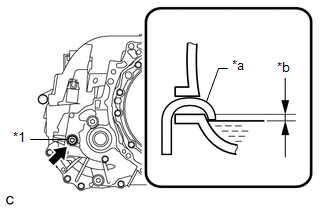
| (f) Add hybrid transaxle fluid until the hybrid transaxle fluid level is between 0 to 5 mm (0 to 0.196 in.) from the bottom lip of the filler plug opening. [*5] NOTICE:
|
|
(g) Using a 10 mm hexagon socket wrench, temporarily install the filler plug and gasket to the hybrid vehicle transaxle assembly. [*6]
HINT:
Because the filler plug will be removed again, the gasket can be reused at this time.
(h) Lower the vehicle. [*7]
(i) Put the engine in inspection mode. [*8]
Click here
(j) Idle the engine for 30 seconds with the power switch on (READY). [*9]
(k) Turn the power switch off. [*10]
(l) Repeat steps [*1] to [*10].
(m) Repeat steps [*1] to [*3].
(n) Using a 10 mm hexagon socket wrench, install the drain plug and a new gasket to the hybrid vehicle transaxle assembly.
Torque:
39.2 N·m {400 kgf·cm, 29 ft·lbf}
2. ADD HYBRID TRANSAXLE FLUID
Click here
3. INSPECT HYBRID TRANSAXLE FLUID
Click here
READ NEXT:
 Adjustment
ADJUSTMENT PROCEDURE 1. REMOVE NO. 1 ENGINE UNDER COVER ASSEMBLY Click here 2. DRAIN HYBRID TRANSAXLE FLUID (a) Using a 10 mm hexagon socket wrench, remove the filler plug and gasket from the hyb
Hybrid Transaxle Oil Seal
ComponentsCOMPONENTS ILLUSTRATION *1 FRONT DRIVE SHAFT OIL SEAL LH *2 FRONT DRIVE SHAFT OIL SEAL RH ● Non-reusable part MP grease ATF WS - - ReplacementREPLACEME
Hybrid Transaxle System
On-vehicle InspectionON-VEHICLE INSPECTION PROCEDURE 1. INSPECT FLUID PRESSURE OF OIL PUMP (a) Remove the rear engine under cover LH. Click here (b) Remove the fluid pump cover plug and O-ring
SEE MORE:
Inspection
INSPECTION PROCEDURE 1. INSPECT INTEGRATION CONTROL AND PANEL ASSEMBLY (ELECTRIC PARKING BRAKE SWITCH) (a) Measure the resistance according to the value(s) in the table below. Standard Resistance: Tester Connection Condition Specified Condition 9 (LOK1) -16 (GND1) OFF(Release) 97.
Lexus Enform Safety Connect
Safety Connect is a subscriptionbased
telematics service that uses
Global Positioning System (GPS)
data and embedded cellular technology
to provide safety and security
features to subscribers. Safety
Connect is supported by Lexus'
designated response center, which
operates 24 hours per day,
