Lexus NX: Transmitter Battery
Replacement
REPLACEMENT
PROCEDURE
1. REMOVE TRANSMITTER BATTERY
| (a) Push the release hook knob and extract the mechanical key. |
|
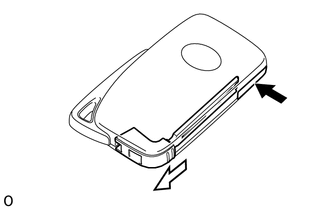
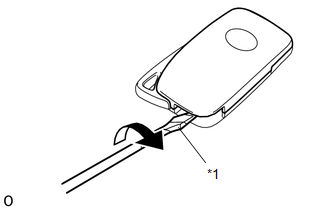
| (b) Using a screwdriver with its tip wrapped in protective tape, remove the transmitter housing cover as shown in the illustration. HINT: Tape the screwdriver tip before use. |
|
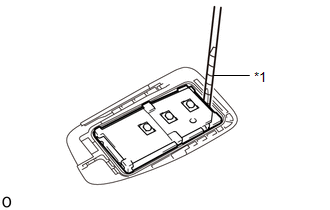
| (c) Using a screwdriver with its tip wrapped in protective tape, remove the transmitter battery holder. HINT: Tape the screwdriver tip before use. |
|
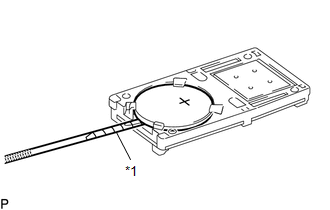
| (d) Using a screwdriver with its tip wrapped in protective tape, remove the transmitter battery. NOTICE:
HINT: Tape the screwdriver tip before use. |
|
2. INSTALL TRANSMITTER BATTERY
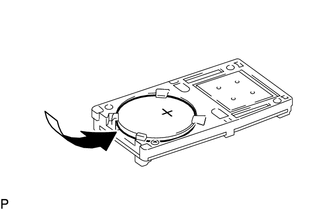
| (a) Install a new transmitter battery (lithium battery: CR2032) with the positive (+) side facing upward as shown in the illustration. NOTICE:
|
|
| (b) Install the transmitter battery holder. |
|
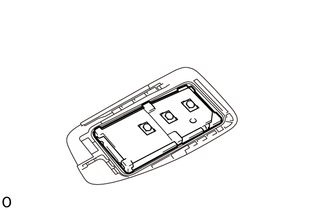
| (c) Install the transmitter housing cover as shown in the illustration. |
|
| (d) Insert the mechanical key as shown in the illustration. |
|

(e) Press one of the transmitter switches and check that the LED illuminates.
OK:
Transmitter LED illuminates when switch is pressed.
3. REMOVE TRANSMITTER (CARD KEY) BATTERY
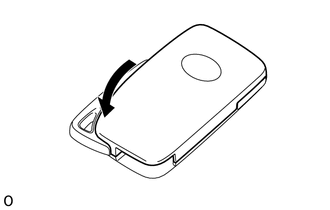
| (a) Lightly hold and pull the battery cover out in the direction indicated by the arrow in the illustration. NOTICE: Do not insert a screwdriver, etc. between the case and battery cover and forcefully bend the battery cover. This will deform the battery cover. HINT:
|
|
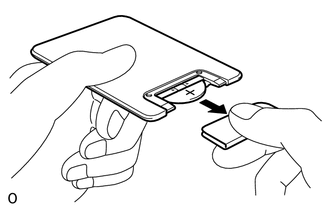
| (b) Remove the transmitter battery (lithium battery: CR2412). NOTICE: When replacing the transmitter battery, before starting work, remove static electricity that has built up in the body by touching, for example, the vehicle to prevent the electrical transmitter from being damaged. |
|

4. INSTALL TRANSMITTER (CARD KEY) BATTERY
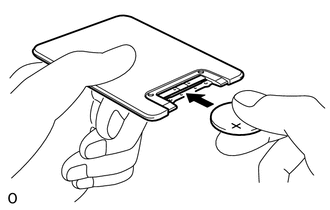
| (a) Push in and install the transmitter battery (lithium battery: CR2412) while being careful of the following: 1) the orientation of the battery positive (+) and negative (-) terminals; and 2) being sure to insert the battery between the 2 terminals and deep into the card in the direction indicated by the arrow in the illustration. NOTICE:
HINT: Check if the card terminals are damaged or the card interior has foreign matter. |
|
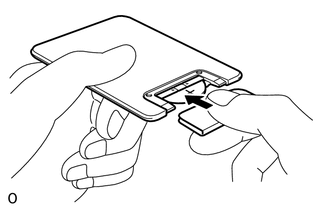
| (b) Install the battery cover so that it clips onto the case. NOTICE:
|
|
READ NEXT:
 Wireless Door Lock Buzzer
ComponentsCOMPONENTS ILLUSTRATION *1 FRONT FENDER SPLASH SHIELD FRONT LH *2 WIRELESS DOOR LOCK BUZZER *3 FRONT SIDE AIR GUIDE SUB-ASSEMBLY LH *4 FRONT FENDER LINER LH Installa
Precaution
PRECAUTION PRECAUTIONS WHEN USING TECHSTREAM (a) When using the Techstream with the vehicle power switch off, connect the Techstream to the DLC3 and turn a courtesy light switch on and off at interval
SEE MORE:
Cruise Control Input Circuit (P0575)
DESCRIPTION When the hybrid vehicle control ECU detects an internal malfunction, DTC P0575 is stored. DTC No. Detection Item DTC Detection Condition Trouble Area DTC Output from P0575 Cruise Control Input Circuit Detection Condition1
When the dynamic radar cruise control system
Calibration
CALIBRATION NOTICE: When any of the following parts have been replaced, perform adjustment shown in the following table. If not, the intuitive parking assist system may not operate correctly. ADJUST INTUITIVE PARKING ASSIST SYSTEM (a) The necessary procedures (adjustment, calibration, initialization
