Lexus NX: "No GPS signal" mark is displayed
CAUTION / NOTICE / HINT
NOTICE:
When replacing the radio receiver assembly, always replace it with a new one.
If a radio receiver assembly which was installed to another vehicle is used, the following may occur:
- A communication malfunction DTC may be stored.
- The radio receiver assembly may not operate normally.
HINT:
Depending on the parts that are replaced during vehicle inspection or maintenance, performing initialization, registration or calibration may be needed. Refer to Precaution for Navigation System.
Click here .gif)
PROCEDURE
| 1. | CHECK CABIN |
(a) Check the cabin for any object that might interrupt radio reception or additional devices which use radio waves on the instrument panel. If such an object exists, remove it and check if the "No GPS signal" mark disappears.
HINT:
The GPS uses extremely weak radio waves originating from satellites. If the signal is interrupted by obstructions or other radio waves, the GPS may not be able to properly receive the signal.
OK:
The "No GPS signal" mark disappears.
| OK | .gif) | NORMAL OPERATION |
|
.gif)
| 2. | CHECK SURROUNDINGS |
(a) Check if the vehicle is in a location where GPS signal reception is poor. If the vehicle is in such a place, relocate the vehicle and check if the "No GPS signal" mark disappears.
HINT:
The GPS uses 24 satellites in 6 orbits. At any point in time, 4 satellites should be able to pinpoint your vehicle. However, GPS signals may not reach the vehicle due to influence from the surroundings, vehicle direction and time. For examples, see the following illustration.
.png)
| *a | Example | *b | In a tunnel |
| *c | In a building | *d | Under an overpass |
| *e | On a forest or tree-lined path | *f | Between tall buildings |
| *g | Under a cliff or overhang | - | - |
OK:
The "No GPS signal" mark disappears.
| OK | | SYSTEM RETURNS TO NORMAL |
|
| 3. | CHECK GPS INFORMATION (OPERATION CHECK) |
| (a) Enter the "System Sensors Check" screen. Refer to Check GPS & Vehicle Sensors in Operation Check. Click here |
|
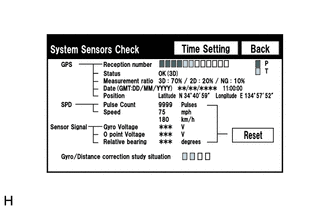
(b) Check how many of the following codes appear in the "Reception number" column.
HINT:
T or P appears.
OK:
At least 3 codes appear.
| OK | | REPLACE RADIO RECEIVER ASSEMBLY |
| NG | | PROCEED TO NEXT SUSPECTED AREA SHOWN IN PROBLEM SYMPTOMS TABLE |
READ NEXT:
 Voice Guidance does not Function
WIRING DIAGRAM CAUTION / NOTICE / HINT NOTICE: When replacing the radio receiver assembly or navigation ECU, always replace it with a new one. If a radio receiver assembly or navigation ECU which was
Route cannot be Calculated
PROCEDURE 1. SET DESTINATION (a) Set another destination and check if the system can calculate the route correctly. OK: Route can be correctly calculated. OK NORMAL OPERATION NG
Voice is not Recognized
PROCEDURE 1. CHECK CONDITION (a) While paying attention to the condition of the spoken voice command, perform a voice recognition operation. OK: Voice command is recognized normally. HINT:
SEE MORE:
Operation Check
OPERATION CHECK CHECK BASIC OPERATION NOTICE:
This check is possible only when the "Power Back Door Function" customization setting using the multi-information display in the combination meter assembly is set to ON (initial setting is ON).
Click here
Before performing an operation check, chec
Removal
REMOVAL PROCEDURE 1. DRAIN ENGINE COOLANT Click here 2. REMOVE NO. 1 ENGINE COVER SUB-ASSEMBLY Click here 3. REMOVE AIR CLEANER CAP AND HOSE Click here 4. REMOVE EGR VALVE ASSEMBLY (a) Disconnect the connector from the EGR valve assembly. (b) Slide the 2 clamps and disconnect
