Lexus NX: Absorber Control Actuator (for Front Side)
Lexus NX Service Manual / Suspension / Suspension Control / Absorber Control Actuator (for Front Side)
On-vehicle Inspection
ON-VEHICLE INSPECTION
PROCEDURE
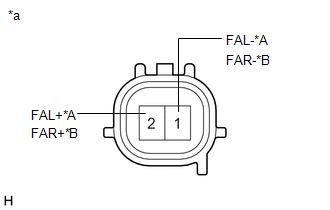
1. INSPECT ABSORBER CONTROL ACTUATOR
| (a) Measure the resistance according to the value(s) in the table below. Standard Resistance: for LH Side
|
|
READ NEXT:
 Absorber Control Actuator (for Rear Side)
On-vehicle InspectionON-VEHICLE INSPECTION PROCEDURE 1. INSPECT ABSORBER CONTROL ACTUATOR (a) Measure the resistance according to the value(s) in the table below. Standard Resistance: for LH Side
Components
COMPONENTS ILLUSTRATION *1 CENTER INSTRUMENT CLUSTER FINISH PANEL ASSEMBLY *2 INSTRUMENT SIDE PANEL LH *3 INSTRUMENT SIDE PANEL RH *4 LOWER NO. 1 INSTRUMENT PANEL FINISH PANEL
SEE MORE:
Outside Vehicle
General MaintenanceGENERAL MAINTENANCE CAUTION / NOTICE / HINT
These are maintenance and inspection items that are considered to be the owner's responsibility.
The owner can do them or they can have them done at a service center. These items include those that should be checked on a daily basis,
Components
COMPONENTS ILLUSTRATION *1 QUARTER OUTSIDE MOULDING SUB-ASSEMBLY LH *2 REAR BUMPER SIDE SEAL LH *3 REAR TIRE PRESSURE MONITOR INITIATOR *4 REAR WHEEL HOUSE FRONT PLATE LH *5 REAR WHEEL HOUSE LINER LH - - N*m (kgf*cm, ft.*lbf): Specified torque - -
© 2016-2026 Copyright www.lexunx.com
