Lexus NX: Absorber Control Actuator (for Rear Side)
Lexus NX Service Manual / Suspension / Suspension Control / Absorber Control Actuator (for Rear Side)
On-vehicle Inspection
ON-VEHICLE INSPECTION
PROCEDURE
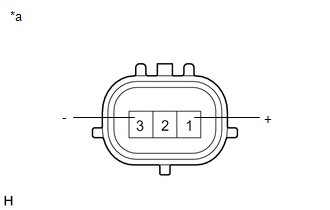
1. INSPECT ABSORBER CONTROL ACTUATOR
| (a) Measure the resistance according to the value(s) in the table below. Standard Resistance: for LH Side
|
|
READ NEXT:
 Components
COMPONENTS ILLUSTRATION *1 CENTER INSTRUMENT CLUSTER FINISH PANEL ASSEMBLY *2 INSTRUMENT SIDE PANEL LH *3 INSTRUMENT SIDE PANEL RH *4 LOWER NO. 1 INSTRUMENT PANEL FINISH PANEL
Removal
REMOVAL PROCEDURE 1. REMOVE CONSOLE ARMREST ASSEMBLY Click here 2. REMOVE UPPER REAR CONSOLE PANEL Click here 3. REMOVE UPPER NO. 2 CONSOLE PANEL GARNISH Click here 4. REMOVE UPPER NO. 1 CONSOLE
SEE MORE:
Diagnostic Trouble Code Chart
DIAGNOSTIC TROUBLE CODE CHART AFS (Adaptive Front-Lighting System) DTC No. Detection Item Link B2410 Headlight Swivel ECU LH Communication B2411 Headlight Swivel ECU RH Communication B2412 Headlight Swivel Motor LH B2413 Headlight Swivel Motor RH
Precaution
PRECAUTION HANDLING PRECAUTIONS (a) For safety, when driving the vehicle, the driver should not operate a portable device that is charging. (b) Anyone using an implanted pacemaker, biventricular pacing pulse generator, cardiac defibrillator or other medical electrical device should consult with thei
© 2016-2026 Copyright www.lexunx.com
