
Lexus NX: Components
COMPONENTS
ILLUSTRATION
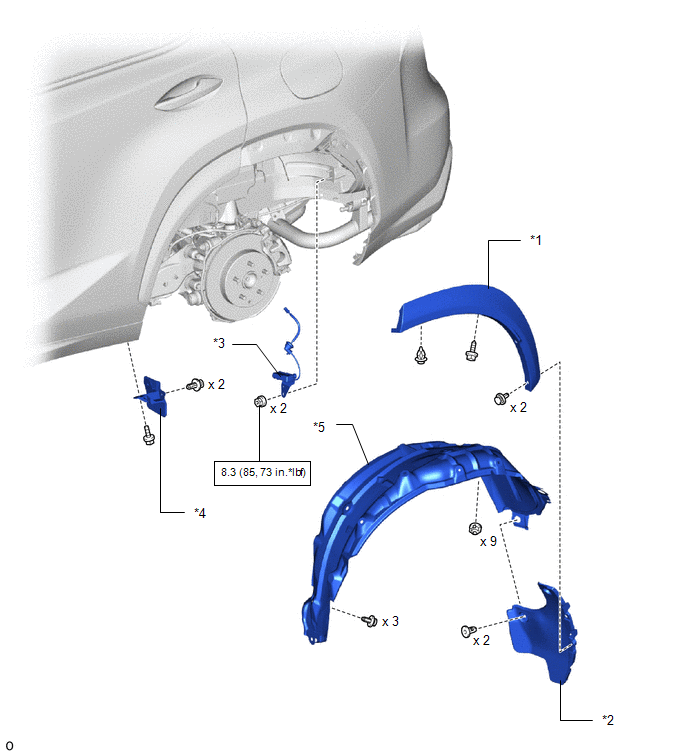
| *1 | QUARTER OUTSIDE MOULDING SUB-ASSEMBLY LH | *2 | REAR BUMPER SIDE SEAL LH |
| *3 | REAR TIRE PRESSURE MONITOR INITIATOR | *4 | REAR WHEEL HOUSE FRONT PLATE LH |
| *5 | REAR WHEEL HOUSE LINER LH | - | - |
 | N*m (kgf*cm, ft.*lbf): Specified torque | - | - |
READ NEXT:
 Removal
REMOVAL PROCEDURE 1. PRECAUTION CAUTION: Be sure to read precaution thoroughly before servicing. Click here 2. REMOVE REAR WHEEL (for LH Side) Click here 3. REMOVE QUARTER OUTSIDE MOULDING SUB-ASS
Installation
INSTALLATION PROCEDURE 1. PRECAUTION CAUTION: Be sure to read precaution thoroughly before servicing. Click here 2. INSTALL REAR TIRE PRESSURE MONITOR INITIATOR (a) Install the rear tire pressure mo
SEE MORE:
Diagnosis System
DIAGNOSIS SYSTEM DESCRIPTION When troubleshooting OBD II (On-Board Diagnostics) vehicles, the Techstream (complying with SAE J1978) must be connected to the DLC3 (Data Link Connector 3) of the vehicle. Various data in the vehicle's ECM (Engine Control Module) can be then read. OBD II regulations re
Installation
INSTALLATION PROCEDURE 1. INSTALL RAIN SENSOR TAPE NOTICE: The rain sensor tape is reusable. Only replace the tape if it is damaged or contaminated. (a) Clean the rain sensor sensing portion with a piece of cloth, etc. (b) Peel off the smaller release sheet, and then attach the rain sensor tape o
© 2016-2026 Copyright www.lexunx.com
