Lexus NX: Certification Ecu
Components
COMPONENTS
ILLUSTRATION
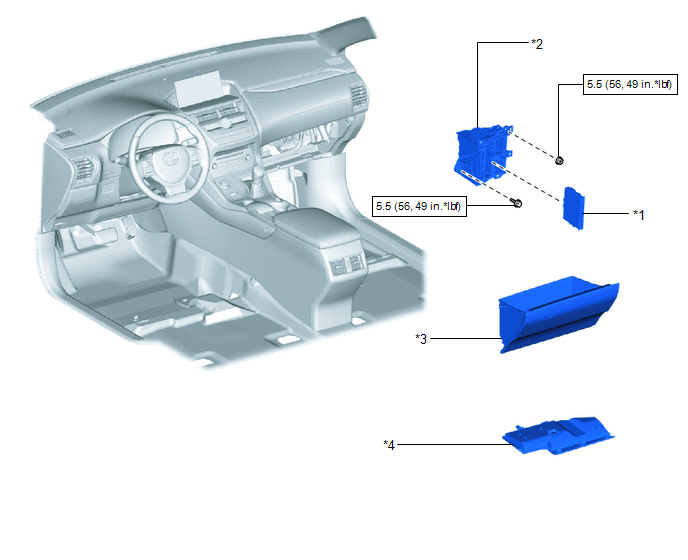
| *1 | CERTIFICATION ECU (SMART KEY ECU ASSEMBLY) | *2 | ECU INTEGRATION BOX RH |
| *3 | GLOVE COMPARTMENT DOOR ASSEMBLY | *4 | NO. 2 INSTRUMENT PANEL UNDER COVER SUB-ASSEMBLY |
.png) | N*m (kgf*cm, ft.*lbf): Specified torque | - | - |
Removal
REMOVAL
PROCEDURE
1. REMOVE NO. 2 INSTRUMENT PANEL UNDER COVER SUB-ASSEMBLY
Click here .gif)
2. REMOVE GLOVE COMPARTMENT DOOR ASSEMBLY
Click here
3. REMOVE ECU INTEGRATION BOX RH
Click here
4. REMOVE CERTIFICATION ECU (SMART KEY ECU)
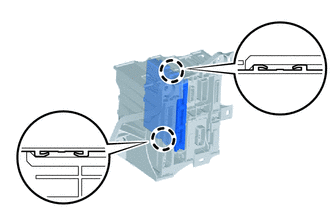
(a) Detach the 2 claws and remove the certificationECU (smart key ECU assembly).
Installation
INSTALLATION
PROCEDURE
1. INSTALL CERTIFICATION ECU (SMART KEY ECU ASSEMBLY)
(a) Attach the 2 claws and install the certification ECU (smart key ECU assembly).
2. INSTALL ECU INTEGRATION BOX RH
Click here .gif)
3. INSTALL GLOVE COMPARTMENT DOOR ASSEMBLY
Click here
4. INSTALL NO. 2 INSTRUMENT PANEL UNDER COVER SUB-ASSEMBLY
Click here
READ NEXT:
 Components
COMPONENTS ILLUSTRATION *1 DECK FLOOR BOX LH *2 NO. 3 DECK BOARD SUB-ASSEMBLY *3 REAR DECK FLOOR BOX *4 NEGATIVE AUXILIARY BATTERY TERMINAL N*m (kgf*cm, ft.*lbf): Specified
Removal
REMOVAL PROCEDURE 1. REMOVE DECK BOARD ASSEMBLY Click here 2. REMOVE NO. 3 DECK BOARD SUB-ASSEMBLY Click here 3. REMOVE REAR DECK FLOOR BOX Click here 4. REMOVE DECK FLOOR BOX LH Click here 5.
SEE MORE:
Components
COMPONENTS ILLUSTRATION *1 INSTRUMENT SIDE PANEL LH *2 NO. 1 INSTRUMENT PANEL SAFETY PAD SUB-ASSEMBLY *3 TRIP SWITCH (LIGHT CONTROL RHEOSTAT) - -
Headlight Cleaner Motor
ComponentsCOMPONENTS ILLUSTRATION *1 FRONT BUMPER ASSEMBLY *2 HEADLIGHT CLEANER MOTOR AND PUMP ASSEMBLY RemovalREMOVAL PROCEDURE 1. REMOVE FRONT BUMPER ASSEMBLY Click here 2. REMOVE HEADLIGHT CLEANER MOTOR AND PUMP ASSEMBLY (a) Loosen the clip and remove the headlight cleaner ho
