Lexus NX: Components
Lexus NX Service Manual / Engine & Hybrid System / 2ar-fxe (intake / Exhaust) / Exhaust Pipe / Components
COMPONENTS
ILLUSTRATION
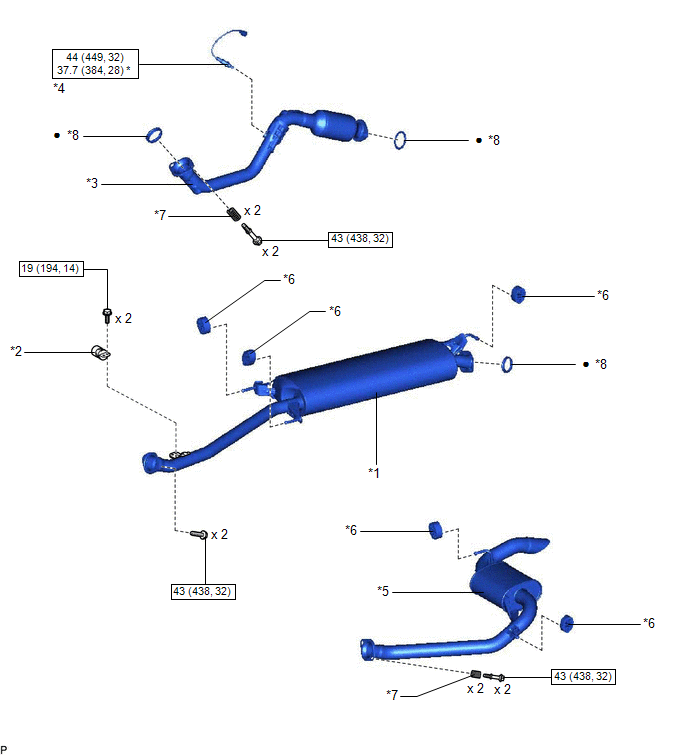
| *1 | CENTER EXHAUST PIPE ASSEMBLY | *2 | EXHAUST PIPE DAMPER |
| *3 | FRONT EXHAUST PIPE ASSEMBLY | *4 | HEATED OXYGEN SENSOR |
| *5 | TAIL EXHAUST PIPE ASSEMBLY | *6 | EXHAUST PIPE SUPPORT |
| *7 | COMPRESSION SPRING | *8 | GASKET |
.png) | N*m (kgf*cm, ft.*lbf): Specified torque | * | For use with SST |
| ● | Non-reusable part | - | - |
READ NEXT:
 Removal
REMOVAL CAUTION / NOTICE / HINT CAUTION:
Wear protective gloves when removing the exhaust pipe assembly.
The exhaust pipe assembly is extremely hot immediately after the engine has stopped.
Con
Installation
INSTALLATION PROCEDURE 1. INSTALL EXHAUST PIPE DAMPER (a) Install the exhaust pipe damper with the 2 bolts. Torque: 19 N·m {194 kgf·cm, 14 ft·lbf} 2. INSTALL HEATED OXYGEN SENSOR Click here 3. I
SEE MORE:
Problem Symptoms Table
PROBLEM SYMPTOMS TABLE HINT:
Inspect the fuses and relays related to this system before inspecting the suspected areas below.
If the problem only occurs in certain locations or at certain times of day, check for wave interference.
If optional components are installed, check for wave interfere
If a warning light turns on or a warning
buzzer sounds
Calmly perform the following actions if any of the warning lights comes
on or
flashes. If a light comes on or flashes, but then goes off, this does not
necessarily
indicate a malfunction in the system. However, if this continues to occur,
have the vehicle inspected by your Lexus dealer.
Acti
© 2016-2026 Copyright www.lexunx.com
