Lexus NX: Disposal
DISPOSAL
PROCEDURE
1. DISPOSE OF REAR SHOCK ABSORBER ASSEMBLY LH
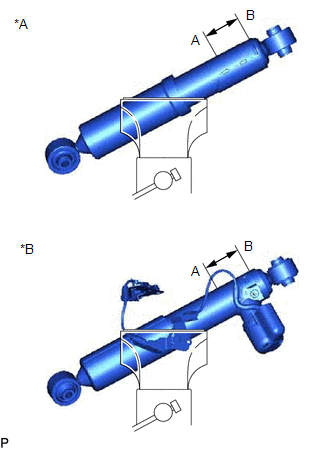
| *A | w/o AVS |
| *B | w/ AVS |
(a) Extend the piston rod and secure the rear shock absorber assembly at an angle in a vise.
(b) Using a drill, make a hole in the cylinder between A and B shown in the illustration to discharge the gas inside.
CAUTION:
Be careful when drilling as shards of metal may fly about. Always use proper safety equipment.
NOTICE:
The gas is colorless, odorless and non poisonous.
READ NEXT:
 Components
COMPONENTS ILLUSTRATION *1 REAR NO. 1 STABILIZER BAR BRACKET *2 REAR STABILIZER BAR *3 REAR STABILIZER BUSHING *4 REAR STABILIZER LINK ASSEMBLY LH *5 REAR STABILIZER LINK ASS
Removal
REMOVAL PROCEDURE 1. REMOVE REAR STABILIZER LINK ASSEMBLY LH (a) Remove the 2 nuts and 2 cushions and disconnect the rear stabilizer link assembly LH from the rear No. 2 suspension arm assembly LH.
SEE MORE:
Generator Resolver Circuit
DESCRIPTION The cause of this malfunction may be the generator resolver. Check the generator resolver internal resistance and connection condition from the inverter to the resolver. Related Parts Check Area Inspection Step Wire harness and connector between the inverter and generator reso
ECM Communication Circuit (C1203)
DESCRIPTION This circuit is used to send TRAC and VSC information from the skid control ECU (brake booster with master cylinder assembly) to the hybrid vehicle control ECU, and hybrid control system information from the hybrid vehicle control ECU to the skid control ECU (brake booster with master cy
© 2016-2026 Copyright www.lexunx.com
