Lexus NX: Components
COMPONENTS
ILLUSTRATION
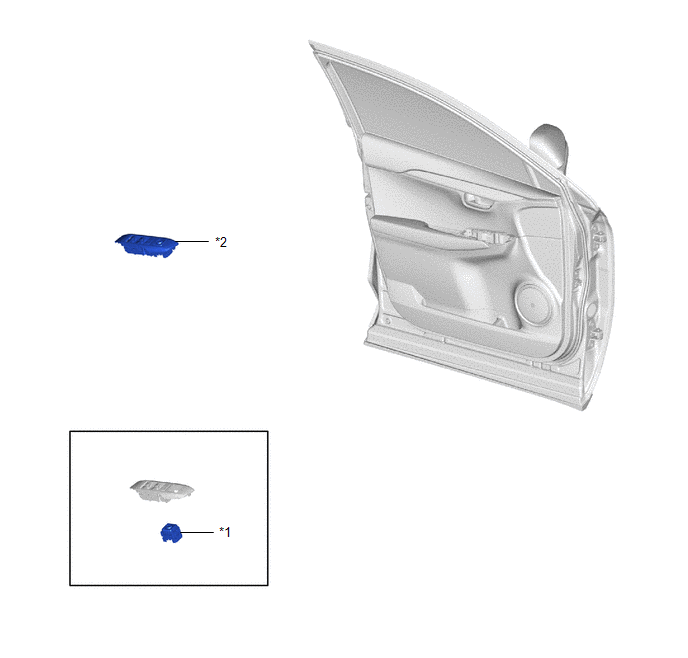
| *1 | OUTER MIRROR SWITCH ASSEMBLY | *2 | POWER WINDOW REGULATOR MASTER SWITCH ASSEMBLY WITH FRONT DOOR ARMREST BASE PANEL |
READ NEXT:
 Removal
REMOVAL PROCEDURE 1. REMOVE POWER WINDOW REGULATOR MASTER SWITCH ASSEMBLY WITH FRONT DOOR ARMREST BASE PANEL Click here 2. REMOVE OUTER MIRROR SWITCH ASSEMBLY (a) Using a precision screwdriver,
Inspection
INSPECTION PROCEDURE 1. INSPECT OUTER MIRROR SWITCH ASSEMBLY (w/ Memory) (a) Check the mirror retract switch. (1) Measure the resistance according to the value(s) in the table below. Standard Resis
Installation
INSTALLATION PROCEDURE 1. INSTALL OUTER MIRROR SWITCH ASSEMBLY (a) Attach the 4 claws and install the outer mirror switch assembly. 2. INSTALL POWER WINDOW REGULATOR MASTER SWITCH ASSEMBLY WITH FRONT
SEE MORE:
How To Proceed With Troubleshooting
CAUTION / NOTICE / HINT HINT:
Use the following procedure to troubleshoot the wiper and washer system.
*: Use the Techstream.
PROCEDURE 1. VEHICLE BROUGHT TO WORKSHOP
NEXT 2. INSPECT AUXILIARY BATTERY (a) Measure the auxiliary battery voltage with the power
Manifold Absolute Pressure Sensor
ComponentsCOMPONENTS ILLUSTRATION *1 MANIFOLD ABSOLUTE PRESSURE SENSOR *2 VACUUM HOSE N*m (kgf*cm, ft.*lbf): Specified torque - - On-vehicle InspectionON-VEHICLE INSPECTION PROCEDURE 1. CHECK MANIFOLD ABSOLUTE PRESSURE SENSOR FUNCTION (a) Connect the Techstream to the DLC3.
© 2016-2026 Copyright www.lexunx.com
