Lexus NX: Components
COMPONENTS
ILLUSTRATION
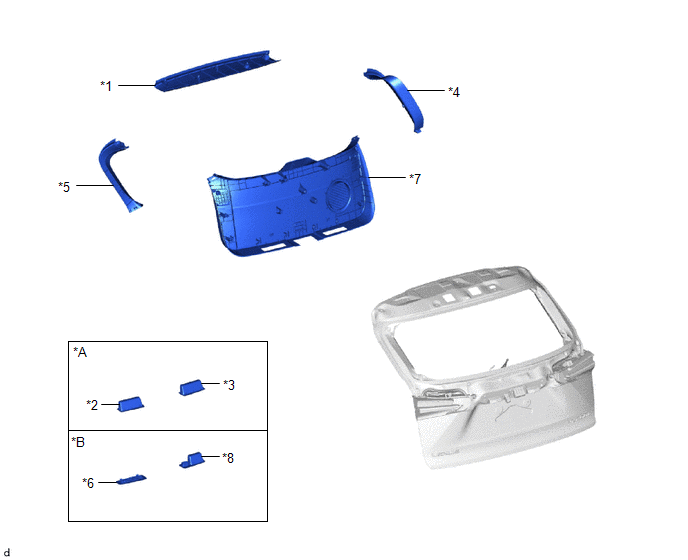
| *A | w/o Power Back Door | *B | w/ Power Back Door |
| *1 | BACK DOOR CENTER GARNISH | *2 | BACK DOOR FINISH COVER LH |
| *3 | BACK DOOR FINISH COVER RH | *4 | BACK DOOR SIDE GARNISH LH |
| *5 | BACK DOOR SIDE GARNISH RH | *6 | BACK DOOR TRIM BASE |
| *7 | BACK DOOR TRIM BOARD ASSEMBLY | *8 | PULL HANDLE |
ILLUSTRATION
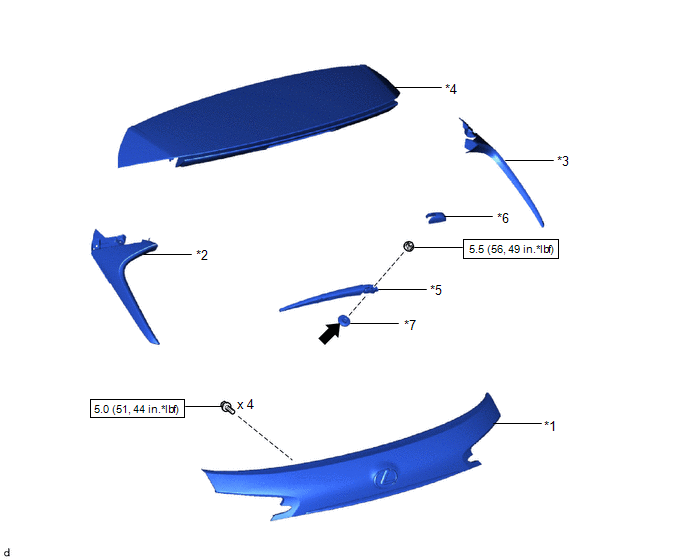
| *1 | BACK DOOR OUTSIDE GARNISH SUB-ASSEMBLY | *2 | REAR SIDE SPOILER SUB-ASSEMBLY LH |
| *3 | REAR SIDE SPOILER SUB-ASSEMBLY RH | *4 | REAR SPOILER |
| *5 | REAR WIPER ARM AND BLADE ASSEMBLY | *6 | REAR WIPER ARM HEAD CAP |
| *7 | REAR WIPER MOTOR GROMMET | - | - |
.png) | N*m (kgf*cm, ft.*lbf) : Specified torque | .png) | MP grease |
ILLUSTRATION
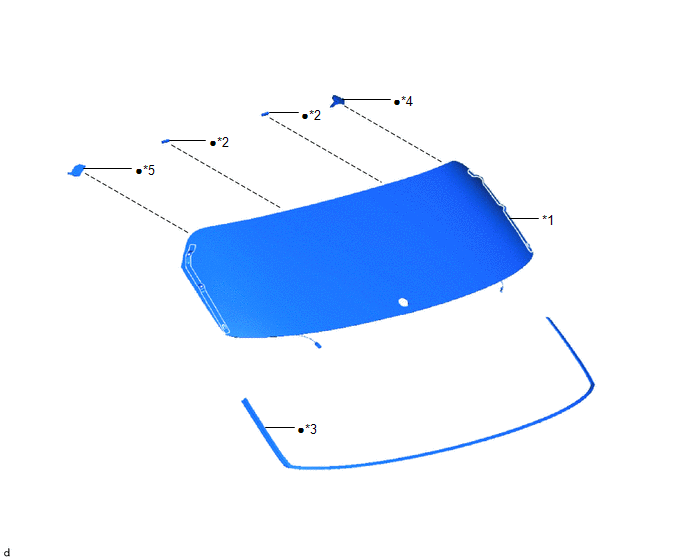
| *1 | BACK DOOR GLASS | *2 | BACK DOOR GLASS SPACER |
| *3 | BACK WINDOW OUTSIDE MOULDING | *4 | NO. 3 BACK WINDOW GLASS SPACER |
| *5 | NO. 4 BACK WINDOW GLASS SPACER | - | - |
| ● | Non-reusable part | - | - |
READ NEXT:
 Removal
REMOVAL CAUTION / NOTICE / HINT HINT:
Use the same procedure for the RH and LH sides.
The procedure listed below is for the LH side.
PROCEDURE 1. REMOVE REAR WIPER ARM HEAD CAP Click here 2.
Installation
INSTALLATION CAUTION / NOTICE / HINT NOTICE: Make sure to use Toyota Genuine Windshield Glass Adhesive (High Modulus Type) or an equivalent high modulus adhesive. HINT:
Use the same procedure for t
Front Passenger Side Power Window Switch
ComponentsCOMPONENTS ILLUSTRATION *1 POWER WINDOW REGULATOR SWITCH ASSEMBLY *2 POWER WINDOW REGULATOR SWITCH ASSEMBLY WITH FRONT DOOR ARMREST BASE PANEL *3 FRONT DOOR ARMREST BASE PAN
SEE MORE:
Customize Parameters
CUSTOMIZE PARAMETERS CUSTOMIZE SLIDING ROOF SYSTEM HINT: The following items can be customized. NOTICE:
When the customer requests a change in a function, first make sure that the function can be customized.
Be sure to make notes of the current settings before customizing.
When troubleshootin
Inspection
INSPECTION PROCEDURE 1. INSPECT CRUISE CONTROL MAIN SWITCH (a) w/o Dynamic Radar Cruise Control System: (1) Measure the resistance according to the value(s) in the table below. *a Component without harness connected (Cruise Control Main Switch) - - Standard Resistance: Tester Connec
© 2016-2026 Copyright www.lexunx.com
