Lexus NX: Components
Lexus NX Service Manual / Audio & Visual & Telematics / Audio / Video / Front Door Speaker / Components
COMPONENTS
ILLUSTRATION
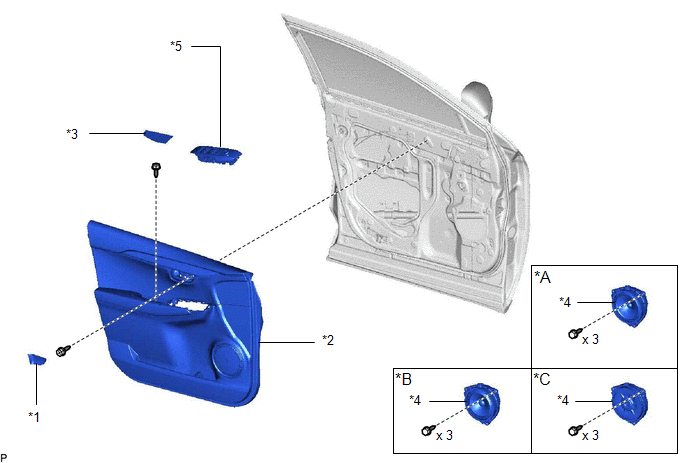
| *A | for 8 Speakers | *B | for 10 Speakers |
| *C | for 14 Speakers | - | - |
| *1 | FRONT DOOR INSIDE HANDLE BEZEL PLUG LH | *2 | FRONT DOOR TRIM BOARD SUB-ASSEMBLY LH |
| *3 | FRONT DOOR TRIM COVER LH | *4 | FRONT NO. 1 SPEAKER ASSEMBLY |
| *5 | POWER WINDOW REGULATOR MASTER SWITCH ASSEMBLY WITH FRONT DOOR ARMREST BASE PANEL | - | - |
READ NEXT:
 Removal
REMOVAL CAUTION / NOTICE / HINT HINT:
Use the same procedure for the RH and LH sides.
The procedure listed below is for the LH side.
PROCEDURE 1. REMOVE FRONT DOOR TRIM COVER LH Click here
Inspection
INSPECTION PROCEDURE 1. INSPECT FRONT NO. 1 SPEAKER ASSEMBLY (a) Measure the resistance according to the value(s) in the table below. Standard Resistance: for 8 Speakers Tester Connection Con
Installation
INSTALLATION CAUTION / NOTICE / HINT HINT:
Use the same procedure for the RH and LH sides.
The procedure listed below is for the LH side.
PROCEDURE 1. INSTALL FRONT NO. 1 SPEAKER ASSEMBLY NOTI
SEE MORE:
Removal
REMOVAL CAUTION / NOTICE / HINT CAUTION: Wear protective gloves. Sharp areas on the parts may injure your hands. PROCEDURE 1. REMOVE TONNEAU COVER ASSEMBLY Click here 2. REMOVE DECK BOARD ASSEMBLY Click here 3. REMOVE BENCH TYPE REAR SEAT CUSHION ASSEMBLY (a) Lift the front end of the rear
Adjustment
ADJUSTMENT PROCEDURE 1. INSPECT SHIFT LEVER POSITION SENSOR POSITION (a) Apply the parking brake. (b) Lock the wheels with chocks to secure the vehicle. (c) Turn the power switch on (READY). (d) Move the shift lever to D and release the brake. NOTICE: Be sure to apply the parking brake and lock the
© 2016-2026 Copyright www.lexunx.com
