Lexus NX: Do-it-yourself service precautions
If you perform maintenance by yourself, be sure to follow the correct procedure as given in these sections.
Maintenance
| Items | Parts and tools |
| 12-volt battery condition |
|
| Brake fluid level |
|
| Engine/power control unit coolant level |
|
| Engine oil level |
|
| Fuses | Fuse with same amperage rating as original |
| Light bulbs | Bulb with same number and wattage rating as original |
| Headlight aim | Phillips-head screw-driver |
| Radiator and condenser |
- |
| Tire inflation pressure |
|
| Washer fluid |
|
WARNING
The engine compartment contains many mechanisms and fluids that may move suddenly, become hot, or become electrically energized. To avoid death or serious injury, observe the following precautions.
■When working on the engine compartment
- Make sure that the "IGNITION ON" on the multi-information display and the "READY" indicator are both off.
- Keep hands, clothing and tools away from the moving fan and engine drive belt.
- Be careful not to touch the engine, power control unit, radiator, exhaust manifold, etc. right after driving as they may be hot. Oil and other fluids may also be hot.
- Do not leave anything that may burn easily, such as paper and rags, in the engine compartment.
- Do not smoke, cause sparks or expose an open flame to fuel. Fuel fumes are flammable.
■When working near the electric cooling fans or radiator grille Be sure the power switch is off.
With power switch in ON mode, the electric cooling fans may automatically start to run if the air conditioning is on and/or the coolant temperature is high.
■Safety glasses Wear safety glasses to prevent flying or falling material, fluid spray, etc. from getting in your eyes.
NOTICE
■If you remove the air cleaner filter Driving with the air cleaner filter removed may cause excessive engine wear due to dirt in the air.
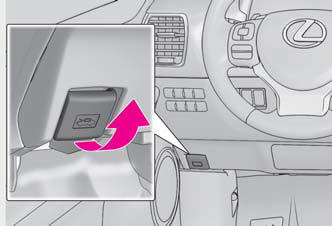
Hood
Opening the hood
1. Pull the hood lock release lever.
The hood will pop up slightly.
2. Pull up the auxiliary catch lever and lift the hood.
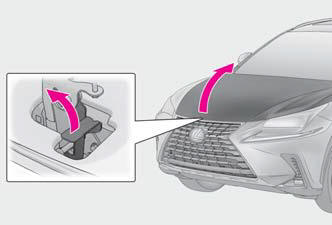
WARNING
■Pre-driving check Check that the hood is fully closed and locked.
If the hood is not locked properly, it may open while the vehicle is in motion and cause an accident, which may result in death or serious injury.
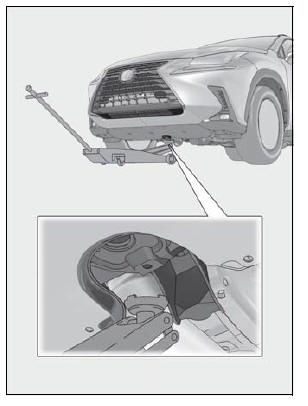
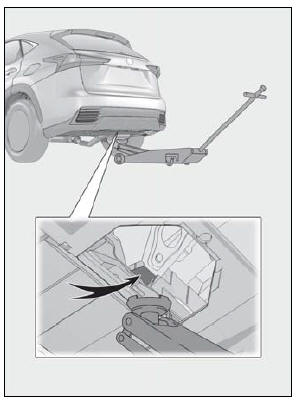
Positioning a floor jack
When using a floor jack, follow the instructions in the manual provided with the jack and perform the operation safely.
When raising your vehicle with a floor jack, position the jack correctly.
Improper placement may damage your vehicle or cause injury.
Location of the jack point
■ Front
■ Rear
1. Remove the bolt A and then remove the cover B.
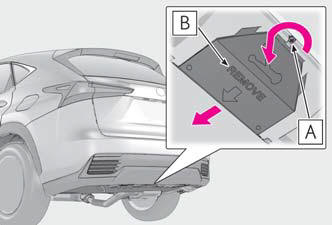
2. Rise your vehicle with a floor jack.
READ NEXT:
 Engine compartment
Components
Fuse box
Engine coolant reservoir
Engine oil filler cap
Power control unit coolant reservoir
Brake fluid reservoir
Radiator
Condenser
Electric cooling fans
Engine oi
12-volt battery
Location
The 12-volt battery is located in the left-hand
side of luggage compartment.
■Before recharging
When recharging, the 12-volt battery produces
hydrogen gas which is flammable
and exp
Tires
Replace or rotate tires in accordance
with maintenance schedules
and treadwear.
Checking tires
Check if the treadwear indicators are
showing on the tires. Also check the
tires for uneven wear, s
SEE MORE:
Brake Warning Light Remains ON
DESCRIPTION The skid control ECU (brake booster with master cylinder assembly) is connected to the combination meter assembly via CAN communication. If any of the following is detected, the brake warning light / red (malfunction) remains on:
The skid control ECU (brake booster with master cylinde
Diagnostic Trouble Code Chart
DIAGNOSTIC TROUBLE CODE CHART Intuitive Parking Assist System DTC No. Detection Item Link C1AE1 Front Left Sensor Malfunction C1AE2 Front Left Center Sensor C1AE3 Front Right Center Sensor C1AE4 Front Right Sensor Malfunction C1AE6 Rear Left S
