Lexus NX: Input Shaft Oil Seal
Components
COMPONENTS
ILLUSTRATION
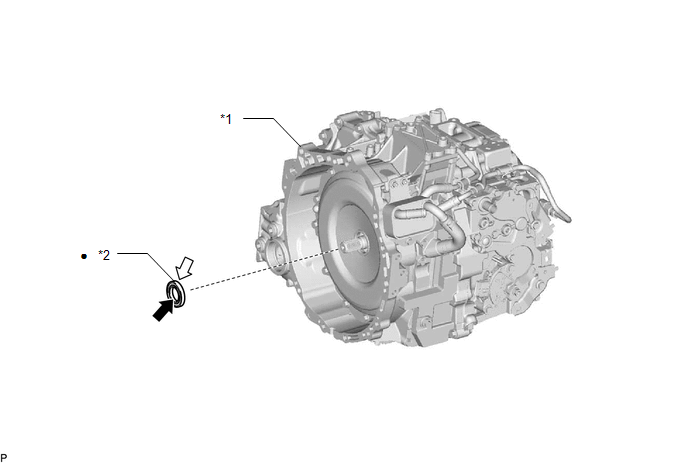
| *1 | HYBRID VEHICLE TRANSAXLE ASSEMBLY | *2 | INPUT SHAFT TYPE T OIL SEAL |
| ● | Non-reusable part | .png) | MP grease |
.png) | ATF WS | - | - |
Replacement
REPLACEMENT
PROCEDURE
1. REMOVE HYBRID VEHICLE TRANSAXLE ASSEMBLY
Click here .gif)
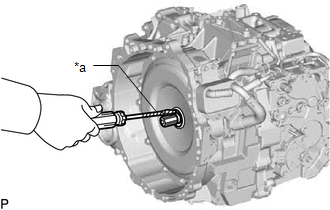
2. REMOVE INPUT SHAFT TYPE T OIL SEAL
| (a) Using a screwdriver with its tip wrapped with protective tape, remove the input shaft type T oil seal from the hybrid vehicle transaxle assembly. NOTICE: When removing the input shaft type T oil seal, make sure not to damage the input shaft assembly or hybrid vehicle transaxle housing. |
|
3. INSTALL INPUT SHAFT TYPE T OIL SEAL
| (a) Coat the lip of a new input shaft type T oil seal with MP grease. |
|
(b) Coat the outside edge of the input shaft type T oil seal with ATF.
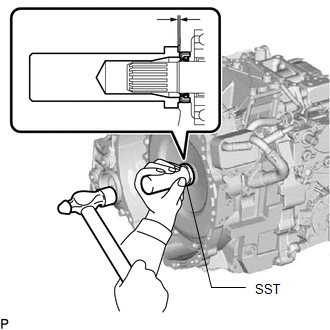
(c) Using SST and a hammer, install the input shaft type T oil seal to the hybrid vehicle transaxle assembly.
SST: 09388-40010
Oil Seal Installation Depth:
1.0 to 1.8 mm (0.0394 to 0.0708 in.)
NOTICE:
- Ensure that no foreign matter adheres to the oil seal lip.
- Ensure that the oil seal is not at an angle.
4. INSTALL HYBRID VEHICLE TRANSAXLE ASSEMBLY
Click here
READ NEXT:
 Components
COMPONENTS ILLUSTRATION *1 NO. 1 ENGINE UNDER COVER ASSEMBLY - - ILLUSTRATION *1 FRONT ENGINE MOUNTING BRACKET *2 HYBRID VEHICLE TRANSAXLE ASSEMBLY *3 NO. 1 MOTOR WATER JA
Removal
REMOVAL PROCEDURE 1. REMOVE NO. 1 ENGINE UNDER COVER ASSEMBLY Click here 2. DRAIN COOLANT (for Inverter Coolant) Click here 3. REMOVE NO. 2 MOTOR WATER JACKET COVER ASSEMBLY (a) Remove the 5
SEE MORE:
Components
COMPONENTS ILLUSTRATION *1 BATTERY SERVICE HOLE COVER *2 HYBRID BATTERY SERVICE PLUG COVER *3 SERVICE PLUG GRIP - - N*m (kgf*cm, ft.*lbf): Specified torque - - ILLUSTRATION *1 NO. 1 ENGINE UNDER COVER ASSEMBLY *2 REAR ENGINE UNDER COVER LH *3 REAR EN
Control Module Communication Bus OFF (U0073,U0124,U0129,U0293)
DESCRIPTION The parking brake ECU assembly communicates with the hybrid vehicle control ECU, skid control ECU (brake booster with master cylinder assembly) and deceleration sensor (airbag ECU assembly) via CAN communication. DTC No. Detection Item DTC Detection Condition Trouble Area Memo
