Lexus NX: Inspection
INSPECTION
PROCEDURE
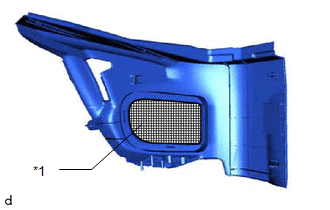
1. INSPECT NO. 3 BATTERY SERVICE COVER BOARD
(a) Inspect the No. 3 battery service cover board.
(1) Visually inspect the filter.
Standard:
No deformation or cracks.
If the result is not as specified, replace the No. 3 battery service cover board.
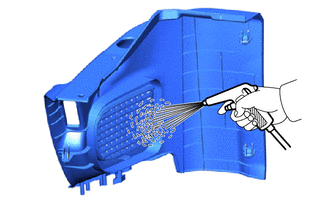
| (2) Clean the filter. Standard: No clogs or damage. NOTICE:
|
|
(b) Clean the filter.
NOTICE:
- Do not use water or any other liquids when cleaning the filter. Use only compressed air.
- To prevent damage to the filter, do not use a wire brush or scrubber.
- Do not use the air gun at a distance closer than 300 mm (1.18 in.) from the filter as it may damage the filter.
- Do not clean the filter with the air gun while it is still installed on the vehicle. This is to prevent damage to the battery cooling blower assembly due to rotation of the fan by the blast from the air gun.
| (1) Clean the filter by blowing compressed air as shown in the illustration. |
|
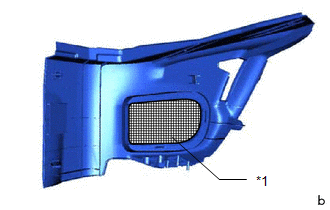
2. INSPECT NO. 2 BATTERY SERVICE COVER BOARD
(a) Inspect the No. 2 battery service cover board.
(1) Visually inspect the filter.
Standard:
No deformation or cracks.
If the result is not as specified, replace the No. 2 battery service cover board.
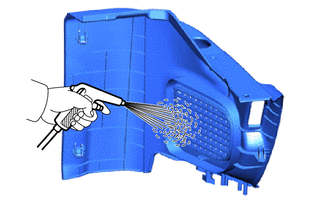
| (2) Clean the filter. Standard: No clogs or damage. NOTICE:
|
|
(b) Clean the filter.
NOTICE:
- Do not use water or any other liquids when cleaning the filter. Use only compressed air.
- To prevent damage to the filter, do not use a wire brush or scrubber.
- Do not use the air gun at a distance closer than 300 mm (1.18 in.) from the filter as it may damage the filter.
- Do not clean the filter with the air gun while it is still installed on the vehicle. This is to prevent damage to the battery cooling blower assembly due to rotation of the fan by the blast from the air gun.
| (1) Clean the filter by blowing compressed air as shown in the illustration. |
|
READ NEXT:
 Installation
INSTALLATION PROCEDURE 1. INSTALL NO. 3 BATTERY SERVICE COVER BOARD (a) for Power Seat: Connect the wire harness clamp and power seat switch connector. (b) Attach the 2 claws and install the No. 3 bat
Components
COMPONENTS ILLUSTRATION *1 BATTERY VOLTAGE SENSOR *2 LOWER NO. 2 HYBRID BATTERY CARRIER PATCH N*m (kgf*cm, ft.*lbf) : Specified torque - -
SEE MORE:
Millimeter Wave Radar Sensor Communication Stop Mode
DESCRIPTION Detection Item Symptom Trouble Area Millimeter Wave Radar Sensor Communication Stop Mode Any of the following conditions are met:
Communication stop for "Front Radar" is indicated on the "Communication Bus Check" screen of the Techstream.
Click here
Communication sy
Brake Booster Pump Motor on Time Abnormally Long (C1252,C1253)
DESCRIPTION The skid control ECU (brake booster with master cylinder assembly) detects decreases in the accumulator pressure according to the data from the accumulator pressure sensor, and then starts and stops the pump motor by operating the motor relay. DTC No. Detection Item INF Code DTC
