Lexus NX: Inspection
INSPECTION
PROCEDURE
1. INSPECT WINDSHIELD WIPER SWITCH ASSEMBLY
(a) w/o Auto Wiper System:
| (1) Measure the resistance according to the value(s) in the table below. Standard Resistance: Front Wiper Switch | Tester Connection | Condition | Specified Condition | | I125-2 (+B) - I125-3 (+1) | MIST | Below 1 Ω | | I125-3 (+1) - I125-1 (+S) | OFF | | I125-3 (+1) - I125-1 (+S) | INT | | I125-2 (+B) - I125-3 (+1) | LO | | I125-2 (+B) - I125-4 (+2) | HI | Front Washer Switch | Tester Connection | Condition | Specified Condition | | I124-4 (EW) - I124-7 (WF) | ON | Below 1 Ω | | I125-5 (WR) - I125-10 (+B2) | | I124-4 (EW) - I124-7 (WF) | OFF | 10 kΩ or higher | | I125-5 (WR) - I125-10 (+B2) | Rear Wiper Switch | Tester Connection | Condition | Specified Condition | | I124-2 (C1R) - I124-4 (EW) | OFF | 10 kΩ or higher | | I124-3 (+1R) - I124-4 (EW) | | I124-2 (C1R) - I124-4 (EW) | INT | Below 1 Ω | | I124-3 (+1R) - I124-4 (EW) | ON | Rear Washer Switch | Tester Connection | Condition | Specified Condition | | I124-4 (EW) - I125-5 (WR) | ON | Below 1 Ω | | I124-7 (WF) - I125-10 (+B2) | | I124-4 (EW) - I125-5 (WR) | OFF | 10 kΩ or higher | | I124-7 (WF) - I125-10 (+B2) | If the result is not as specified, replace the windshield wiper switch assembly. | 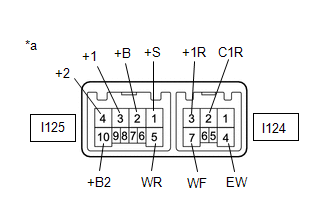 | | *a | Component without harness connected (Windshield Wiper Switch Assembly) | | |
(b) w/ Auto Wiper System:
| (1) Measure the resistance according to the value(s) in the table below. If the result is not as specified, replace the windshield wiper switch assembly. Standard Resistance: Front Wiper Switch | Tester Connection | Condition | Specified Condition | | I125-2 (+B) - I125-3 (+1) | MIST | Below 1 Ω | | I125-3 (+1) - I125-1 (+S) | OFF | | I125-3 (+1) - I125-1 (+S) | AUTO | | I125-8 (AUTO) - I125-9 (E) | | I125-2 (+B) - I125-3 (+1) | LO | | I125-2 (+B) - I125-4 (+2) | HI | Front Washer Switch | Tester Connection | Condition | Specified Condition | | I124-4 (EW) - I124-7 (WF) | ON | Below 1 Ω | | I125-5 (WR) - I125-10 (+B2) | | I124-4 (EW) - I124-7 (WF) | OFF | 10 kΩ or higher | | I125-5 (WR) - I125-10 (+B2) | Rear Wiper Switch | Tester Connection | Condition | Specified Condition | | I124-2 (C1R) - I124-4 (EW) | OFF | 10 kΩ or higher | | I124-3 (+1R) - I124-4 (EW) | | I124-2 (C1R) - I124-4 (EW) | INT | Below 1 Ω | | I124-3 (+1R) - I124-4 (EW) | ON | Rear Washer Switch | Tester Connection | Condition | Specified Condition | | I124-4 (EW) - I125-5 (WR) | ON | Below 1 Ω | | I124-7 (WF) - I125-10 (+B2) | | I124-4 (EW) - I125-5 (WR) | OFF | 10 kΩ or higher | | I124-7 (WF) - I125-10 (+B2) | Adjusting Ring* | Tester Connection | Condition | Specified Condition | | I125-6 (VR2) - I125-7 (VR1) | P1 | 209 to 231 Ω | | P2 | 114 to 126 Ω | | P3 | 58.9 to 65.1 Ω | | P4 | Below 1 Ω | | 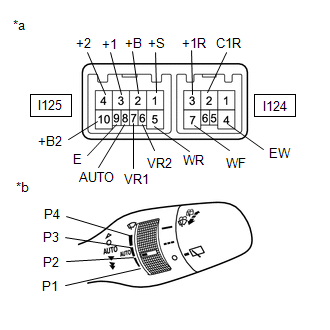 | | *a | Component without harness connected (Windshield Wiper Switch Assembly) | | *b | Windshield Wiper Switch Assembly (Adjusting Ring Position) | | |
READ NEXT:
INSTALLATION PROCEDURE 1. INSTALL WINDSHIELD WIPER SWITCH ASSEMBLY (a) Attach the claw to install the windshield wiper switch assembly. (b) Connect each connector. 2. INSTALL UPPER STEERING COLUMN COV
SEE MORE:
DATA LIST / ACTIVE TEST DATA LIST HINT: Using the Techstream to read the Data List allows the values or states of switches, sensors, actuators and other items to be read without removing any parts. This non-intrusive inspection can be very useful because intermittent conditions or signals may be dis
INSPECTION PROCEDURE 1. INSPECT HEADUP DISPLAY SWITCH ASSEMBLY *1 HUD Switch *2 TILT Switch *3 RHEOSTAT Switch *4 DISP Switch *a Component without harness connected (Headup Display Switch Assembly) (a) Check the resistance. Measure the resistance according to the val
© 2016-2026 Copyright www.lexunx.com


 Installation