Lexus NX: Inspection
INSPECTION
PROCEDURE
1. INSPECT TRIP SWITCH
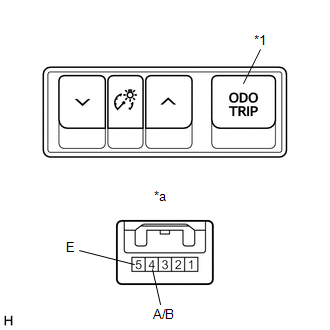
| *1 | ODO TRIP Switch |
| *a | Component without harness connected (Trip Switch) |
(a) Check the resistance.
Measure the resistance according to the value(s) in the table below.
Standard Resistance:
| Tester Connection | Switch Condition | Specified Condition |
|---|---|---|
| 4 (A/B) - 5 (E) | ODO TRIP switch on (Pushed) | Below 1 Ω |
| ODO TRIP switch off (Not pushed) | 10 kΩ or higher |
If the result is not as specified, replace the trip switch.
| (b) Check the illumination. Apply battery voltage to the connector and check the illumination condition. OK:
If the result is not as specified, replace the trip switch. |
|
.png)
READ NEXT:
 Installation
INSTALLATION PROCEDURE 1. INSTALL TRIP SWITCH (a) Attach the 2 claws to install the trip switch. 2. INSTALL NO. 1 INSTRUMENT PANEL SAFETY PAD SUB-ASSEMBLY Click here 3. INSTALL INST
SEE MORE:
Installation
INSTALLATION PROCEDURE 1. INSTALL FUEL PUMP CONTROL ECU ASSEMBLY Click here 2. INSTALL PARKING BRAKE ECU ASSEMBLY (a) Install the parking brake ECU assembly with the 2 bolts. Torque: 8.0 N·m {82 kgf·cm, 71 in·lbf} (b) Connect the 3 connectors. 3. INSTALL DECK TRIM SIDE PANEL ASSEMBLY LH Click
Components
COMPONENTS ILLUSTRATION *1 BENCH TYPE REAR SEAT CUSHION ASSEMBLY - - ILLUSTRATION *1 BENCH TYPE REAR SEAT CUSHION COVER (REAR SEAT CUSHION HEATER ASSEMBLY) *2 BENCH TYPE REAR SEAT CUSHION PAD *3 HOG RING - - ● Non-reusable part - -
