
Lexus NX: Inspection
INSPECTION
PROCEDURE
1. INSPECT INNER REAR VIEW MIRROR ASSEMBLY
(a) Inspect the operation of the electrochromic inner rear view mirror assembly.
(1) Connect a positive (+) lead from the battery to terminal 1 (IG) and a negative (-) lead to terminal 2 (E).
(2) Press the AUTO switch.
(3) Attach black colored tape to the forward sensor to prevent it from sensing.
(4) Light up the mirror with an electric light, and check that the mirror surface changes from bright to dark.
OK:
Mirror surface changes from bright to dark.
(5) Measure the voltage according to the value(s) in the table below.
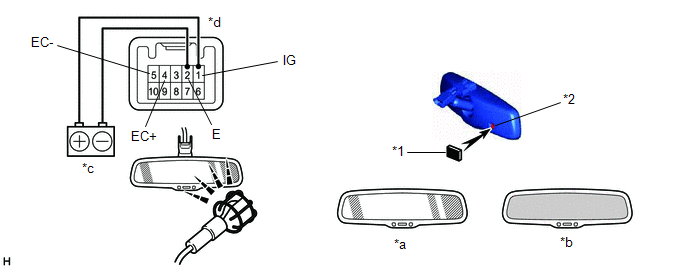
| *1 | Black Colored Tape | *2 | Forward Sensor |
| *a | Bright | *b | Dark |
| *c | Battery | *d | Component without harness connected (Inner Rear View Mirror Assembly) |
Standard Voltage:
| Tester Connection | Condition | Specified Condition |
|---|---|---|
| 4 (EC+) - 5 (EC-) | Inner rear view mirror surface Bright → Dark | Below 1 V → 1.25 V |
If the result is not as specified, replace the inner rear view mirror assembly.
READ NEXT:
 Installation
INSTALLATION PROCEDURE 1. INSTALL INNER REAR VIEW MIRROR ASSEMBLY (a) Slide the inner rear view mirror assembly in the direction indicated by the arrow shown in the illustration to install the inne
Accessory Socket System
Parts LocationPARTS LOCATION ILLUSTRATION *1 VOLTAGE INVERTER ASSEMBLY *2 NO. 2 POWER OUTLET SOCKET ASSEMBLY *3 INSTRUMENT PANEL JUNCTION BLOCK ASSEMBLY - ECU-IG NO.1 FUSE *4 NO.
SEE MORE:
Installation
INSTALLATION PROCEDURE 1. INSTALL STOP LIGHT CONTROL ECU ASSEMBLY (a) Attach the clamp to install the stop light control ECU assembly. (b) Connect the connector. 2. INSTALL LOWER NO. 1 INSTRUMENT PANEL FINISH PANEL Click here 3. INSTALL NO. 1 INSTRUMENT PANEL UNDER COVER SUB-ASSEMBLY Click here
Components
COMPONENTS ILLUSTRATION *1 DECK FLOOR BOX LH *2 REAR DECK FLOOR BOX *3 UPPER INSTRUMENT PANEL *4 AUXILIARY BATTERY NEGATIVE TERMINAL N*m (kgf*cm, ft.*lbf): Specified torque - - ILLUSTRATION *1 INSTRUMENT PANEL PASSENGER AIRBAG ASSEMBLY *2 NO. 2 INSTRUMENT
