Lexus NX: Installation
INSTALLATION
PROCEDURE
1. INSTALL INNER REAR VIEW MIRROR ASSEMBLY
| (a) Slide the inner rear view mirror assembly in the direction indicated by the arrow shown in the illustration to install the inner rear view mirror assembly. |
|
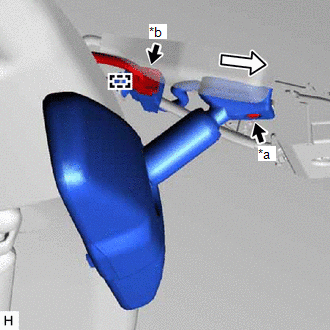
(b) Using a T20 "TORX" socket wrench, install the screw.
Torque:
1.75 N·m {18 kgf·cm, 15 in·lbf}
(c) Connect the connector and attach the clamp.
2. INSTALL NO. 1 FORWARD RECOGNITION COVER
Click here .gif)
3. INSTALL NO. 2 FORWARD RECOGNITION COVER
Click here
READ NEXT:
 Accessory Socket System
Parts LocationPARTS LOCATION ILLUSTRATION *1 VOLTAGE INVERTER ASSEMBLY *2 NO. 2 POWER OUTLET SOCKET ASSEMBLY *3 INSTRUMENT PANEL JUNCTION BLOCK ASSEMBLY - ECU-IG NO.1 FUSE *4 NO.
Power Outlet Socket
ComponentsCOMPONENTS ILLUSTRATION *A w/ Rear Seat Heater - - *1 CIGARETTE LIGHTER COVER *2 NO. 2 POWER OUTLET SOCKET ASSEMBLY *3 REAR CONSOLE END PANEL SUB-ASSEMBLY - -
SEE MORE:
Height Control Sensor Data Out of Range When Initializing (B2452)
DESCRIPTION The headlight ECU sub-assembly LH stores this DTC if the value from the rear height control sensor sub-assembly LH is out of range when performing initialization of the headlight ECU sub-assembly LH, such as when the vehicle is not level or jacked up. DTC No. Detection Item DTC De
Drive Motor "A" Torque Delivered Performance (P0C19-306)
DTC SUMMARY MALFUNCTION DESCRIPTION This DTC indicates that the motor torque execution value does not correspond to the torque command value sent from the hybrid vehicle control ECU to the motor. The cause of this malfunction may be one of the following: Area Main Malfunction Description Step
© 2016-2026 Copyright www.lexunx.com
