Lexus NX: Power Back Door Main Switch
Inspection
INSPECTION
PROCEDURE
1. INSPECT POWER BACK DOOR MAIN SWITCH
(a) Check the resistance.
| (1) Measure the resistance according to the value(s) in the table below. Standard Resistance:
If the result is not as specified, replace the power back door main switch. |
|
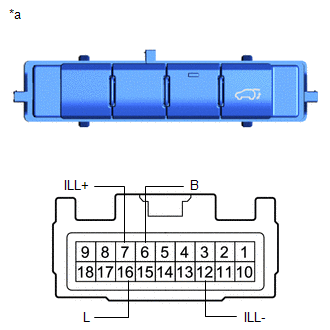
(b) Inspect the illumination operation.
(1) Apply battery voltage to the power back door main switch connector, and check that the power back door main switch LED illuminates.
OK:
| Measurement Condition | Specified Condition |
|---|---|
| Battery positive (+) → Terminal 7 (ILL+) Battery negative (-) → Terminal 12 (ILL-) | LED illuminates |
If the result is not as specified, replace the power back door main switch.
READ NEXT:
 Precaution
PRECAUTION PRECAUTIONS FOR HANDS FREE POWER BACK DOOR (w/ Hands Free Power Back Door) (a) In the following situations, the hands free power back door may operate unintentionally if the electrical tran
Parts Location
PARTS LOCATION ILLUSTRATION *A w/ Hands Free Power Back Door - - *1 BACK DOOR OPENER SWITCH ASSEMBLY *2 BACK DOOR CONTROL SWITCH *3 POWER BACK DOOR SENSOR ASSEMBLY RH *4
SEE MORE:
Hydraulic Control System Malfunction (C1214)
DESCRIPTION The skid control ECU (brake booster with master cylinder assembly) controls braking force according to the hybrid control system regenerative braking force and provides the hydraulic pressure necessary for operating each wheel cylinder according to the wheel cylinder pressure sensor. DTC
Installation
INSTALLATION PROCEDURE 1. INSTALL EXHAUST PIPE DAMPER (a) Install the exhaust pipe damper with the 2 bolts. Torque: 19 N·m {194 kgf·cm, 14 ft·lbf} 2. INSTALL HEATED OXYGEN SENSOR Click here 3. INSTALL FRONT EXHAUST PIPE ASSEMBLY (a) Using a vernier caliper, measure the free length of the co
