Lexus NX: Inspection
INSPECTION
PROCEDURE
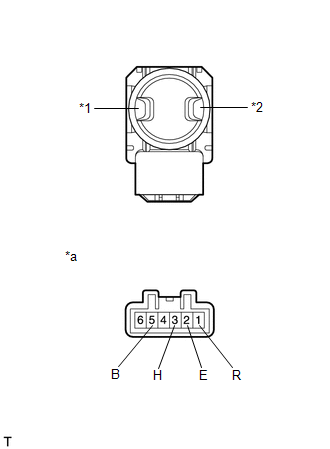
1. INSPECT FRONT LUMBAR POWER SEAT SWITCH
| (a) Measure the resistance according to the value(s) in the table below. Standard Resistance:
If the result is not as specified, replace the front lumbar power seat switch. |
|
READ NEXT:
 Installation
INSTALLATION PROCEDURE 1. INSTALL FRONT LUMBAR POWER SEAT SWITCH (a) Attach the 4 claws to install the front lumbar power seat switch. 2. INSTALL FRONT POWER SEAT SWITCH LH Click here 3. INSTALL FRO
Components
COMPONENTS ILLUSTRATION *1 FRONT LOWER SEAT CUSHION SHIELD *2 FRONT POWER SEAT SWITCH LH *3 FRONT SEAT CUSHION SHIELD LH *4 POWER SEAT SWITCH KNOB LH *5 POWER SEAT SWITCH KNO
SEE MORE:
Steering Angle Sensor Unusual Bank Angle Detected (C1440)
DESCRIPTION If the skid control ECU (brake booster with master cylinder assembly) determines that the vehicle is being driven at a steep bank angle, the skid control ECU (brake booster with master cylinder assembly) stores DTC C1440 while VSC operation is temporarily disabled. This is not a malfunct
Terminals Of Ecu
TERMINALS OF ECU MULTIPLEX TILT AND TELESCOPIC ECU *a Component without harness connected (Multiplex Tilt and Telescopic ECU) - - (a) Measure the voltage and resistance according to the value(s) in the table below. Terminal No. (Symbol) Wiring Color Terminal Description Conditi
© 2016-2026 Copyright www.lexunx.com
