Lexus NX: Removal
REMOVAL
CAUTION / NOTICE / HINT
HINT:
- Use the same procedure for the RH and LH sides.
- The procedure listed below is for the LH side.
PROCEDURE
1. REMOVE TONNEAU COVER ASSEMBLY
Click here .gif)
2. REMOVE DECK BOARD ASSEMBLY
Click here
3. REMOVE NO. 3 DECK BOARD SUB-ASSEMBLY
Click here
4. REMOVE NO. 2 DECK BOARD SUB-ASSEMBLY
Click here
5. REMOVE REAR DECK FLOOR BOX
Click here
6. REMOVE SPARE TIRE
Click here
7. REMOVE DECK FLOOR BOX LH
Click here
8. REMOVE DECK FLOOR BOX RH
Click here
9. REMOVE NO. 1 TOOL BOX SUB-ASSEMBLY
Click here
10. REMOVE NO. 2 TOOL BOX SUB-ASSEMBLY
Click here
11. REMOVE REAR FLOOR FINISH PLATE
Click here
12. REMOVE REAR SEAT ASSEMBLY (for Manual Seat)
Click here
13. REMOVE REAR SEAT ASSEMBLY (for Power Seat)
Click here
14. REMOVE REAR DOOR SCUFF PLATE LH
Click here
15. REMOVE REAR DOOR OPENING TRIM WEATHERSTRIP LH
Click here
16. REMOVE BACK DOOR WEATHERSTRIP
Click here
17. REMOVE LUGGAGE HOLD BELT STRIKER ASSEMBLY
Click here
18. REMOVE NO. 1 LUGGAGE COMPARTMENT TRIM HOOK
Click here
19. REMOVE ROPE HOOK ASSEMBLY
Click here
20. REMOVE NO. 3 BATTERY SERVICE COVER BOARD
Click here
21. REMOVE DECK TRIM UPPER SIDE BOARD LH
Click here
22. REMOVE DECK TRIM SIDE PANEL ASSEMBLY LH
Click here
23. REMOVE ROOF SIDE INNER GARNISH ASSEMBLY LH
Click here
24. REMOVE QUARTER WINDOW ASSEMBLY LH
NOTICE:
- When separating the quarter window assembly LH from the vehicle, be careful not to damage the vehicle paint or interior/exterior ornaments.
- Be sure to replace the quarter window assembly LH with a new one.
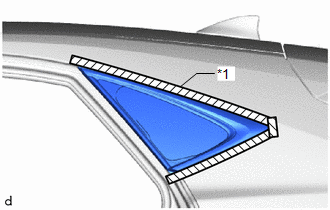
| *1 | Protective Tape |
HINT:
Apply protective tape to the outer surface of the vehicle body to prevent scratches.
(a) Using a knife, cut off the moulding as shown in the illustration.
NOTICE:
Be careful not to damage the vehicle body.
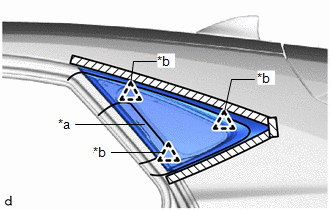
| (b) From the interior, insert a piano wire between the vehicle body and the quarter window assembly LH as shown in the illustration. |
|
(c) Tie objects that can serve as handles (for example, wooden blocks) to both wire ends.
(d) Cut through the adhesive by pulling the piano wire around the quarter window assembly LH.
NOTICE:
Leave as much adhesive on the vehicle body as possible when removing the quarter window assembly LH.
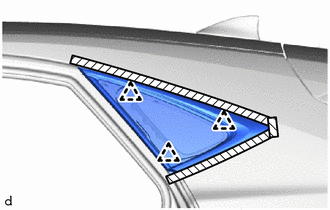
| (e) Using suction cups, detach the 3 clips and remove the quarter window assembly LH. NOTICE: Be careful not to drop the quarter window assembly LH. HINT: If a clip is difficult to detach, cut it. |
|
READ NEXT:
 Installation
INSTALLATION CAUTION / NOTICE / HINT HINT:
Use the same procedure for the RH and LH sides.
The procedure listed below is for the LH side.
A bolt without a torque specification is shown in the s
Rear Power Window Switch
ComponentsCOMPONENTS ILLUSTRATION *1 REAR POWER WINDOW REGULATOR SWITCH ASSEMBLY *2 REAR POWER WINDOW REGULATOR SWITCH ASSEMBLY WITH REAR DOOR ARMREST BASE PANEL *3 REAR DOOR ARMREST
Relay
On-vehicle InspectionON-VEHICLE INSPECTION PROCEDURE 1. INSPECT FRONT WIPER DEICER RELAY (a) Measure the resistance according to the value(s) in the table below. Standard Resistance: Tester Co
SEE MORE:
Drive Motor "B" Control Module (P0A1C-713)
DESCRIPTION The MG ECU, which is built into the inverter with converter assembly, monitors its internal operation and will store DTCs if the system is malfunctioning. If any of the following DTCs are output, replace the inverter with converter assembly. DTC No. Detection Item DTC Detection Co
Installation
INSTALLATION CAUTION / NOTICE / HINT HINT: A bolt without a torque specification is shown in the standard bolt chart. Click here PROCEDURE 1. INSTALL CONSOLE BOX ASSEMBLY (a) Attach the 4 guides to install the console box assembly. (b) Install the 6 bolts. (c) Connect the connectors and attach the
