Lexus NX: Inspection
INSPECTION
PROCEDURE
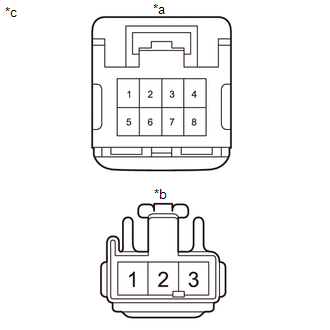
1. INSPECT BENCH TYPE REAR SEAT CUSHION COVER (REAR SEAT CUSHION HEATER ASSEMBLY RH)
| (a) Check the bench type rear seat cushion cover (rear seat cushion heater assembly RH). NOTICE: Disconnect the connector B from the rear seat cushion heater assembly LH before checking it. (1) Measure the resistance according to the value(s) in the table below. Standard Resistance:
If the result is not as specified, replace the bench type rear seat cushion cover (rear seat cushion heater assembly RH). |
|
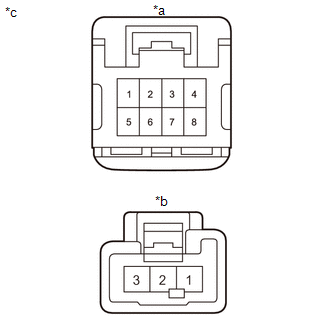
2. INSPECT BENCH TYPE REAR SEAT CUSHION COVER (REAR SEAT CUSHION HEATER ASSEMBLY LH)
| (a) Check the bench type rear seat cushion cover (rear seat cushion heater assembly LH). NOTICE: Disconnect the connector B from the rear seat cushion heater assembly RH before checking it. (1) Measure the resistance according to the value(s) in the table below. Standard Resistance:
If the result is not as specified, replace the bench type rear seat cushion cover (rear seat cushion heater assembly LH). |
|
READ NEXT:
 Installation
INSTALLATION CAUTION / NOTICE / HINT CAUTION: Wear protective gloves. Sharp areas on the parts may injure your hands. PROCEDURE 1. INSTALL BENCH TYPE REAR SEAT CUSHION COVER (REAR SEAT CUSHION HEATER)
Components
COMPONENTS ILLUSTRATION *1 REAR SEAT CUSHION ASSEMBLY - - ILLUSTRATION *1 BENCH TYPE REAR SEAT CUSHION COVER (REAR SEAT CUSHION HEATER) *2 BENCH TYPE REAR SEAT CUSHION PAD *
SEE MORE:
On-vehicle Inspection
ON-VEHICLE INSPECTION CAUTION / NOTICE / HINT NOTICE: If using a dropper to adjust the fluid amount, make sure that the dropper has not been used with mineral oils, water or deteriorated brake fluid. Sealed areas may deteriorate and lead to fluid leaks, or the fluid may deteriorate and lead to decre
Removal
REMOVAL PROCEDURE 1. PRECAUTION CAUTION: Be sure to read precaution thoroughly before servicing. Click here 2. REMOVE REAR WHEEL (for LH Side) Click here 3. REMOVE QUARTER OUTSIDE MOULDING SUB-ASSEMBLY LH Click here 4. REMOVE REAR BUMPER SIDE SEAL LH (a) Remove the 2 clips and rear bumper s
