Lexus NX: Inspection
INSPECTION
PROCEDURE
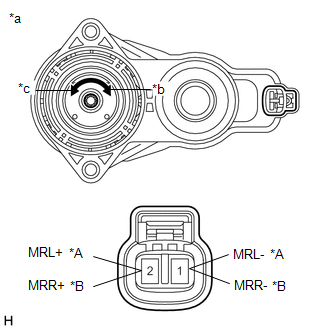
1. INSPECT PARKING BRAKE ACTUATOR ASSEMBLY
(a) Parking brake actuator assembly operation inspection
| (1) Apply voltage to the terminals of the parking brake actuator assembly and check that it operates as specified. OK: LH
If the result is not as specified, replace the parking brake actuator assembly. |
|
READ NEXT:
 Installation
INSTALLATION PROCEDURE 1. INSTALL PARKING BRAKE ACTUATOR ASSEMBLY LH (a) Apply a light coat of lithium soap base glycol grease to the new O-ring. (b) Install the O-ring to the rear disc brake cylinder
Components
COMPONENTS ILLUSTRATION *1 DECK FLOOR BOX LH *2 NO. 3 DECK BOARD SUB-ASSEMBLY *3 REAR DECK FLOOR BOX *4 NEGATIVE AUXILIARY BATTERY TERMINAL N*m (kgf*cm, ft.*lbf): Specified
SEE MORE:
Sliding Roof Switch Assembly
ComponentsCOMPONENTS ILLUSTRATION *1 MAP LIGHT ASSEMBLY (SLIDING ROOF SWITCH ASSEMBLY) - - InspectionINSPECTION PROCEDURE 1. INSPECT MAP LIGHT ASSEMBLY (SLIDING ROOF SWITCH ASSEMBLY) (a) Measure the resistance according to the value(s) in the table below. Standard Resistance: T
Antenna Coil Open / Short (B2784)
DESCRIPTION When an open or short circuit is detected in the transponder key amplifier coil built into the power switch, the certification ECU (smart key ECU assembly) stores this DTC. This DTC is also stored as a past DTC. DTC No. Detection Item DTC Detection Condition Trouble Area Note
