Lexus NX: Inspection
Lexus NX Service Manual / Drivetrain / Drive Shaft / Propeller Shaft / Rear Drive Shaft Assembly / Inspection
INSPECTION
CAUTION / NOTICE / HINT
NOTICE:
- When using a vise, place aluminum plates between the part and vise.
- When using a vise, do not overtighten it.
PROCEDURE
1. INSPECT REAR DRIVE SHAFT ASSEMBLY
| (a) Check that there is no excessive play in the radial direction of the inboard joint and outboard joint. |
|
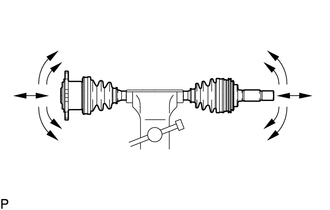
(b) Check the inboard joint boot and outboard joint boot for damage.
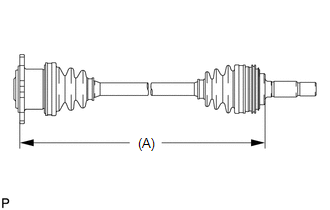
| (c) Check that the inboard joint boot and outboard joint boot are not stretched or contracted when the rear drive shaft assembly is at the standard length. Length (A): 598.1 to 608.1 cm (1.96 to 1.99 ft.) NOTICE: Keep the rear drive shaft assembly level during inspection. If the inboard joint boot and outboard joint boot are stretched or contracted, correct them. |
|
READ NEXT:
 Reassembly
REASSEMBLY CAUTION / NOTICE / HINT NOTICE:
When using a vise, place aluminum plates between the part and vise.
When using a vise, do not overtighten it.
HINT:
Use the same procedure for the
Installation
INSTALLATION CAUTION / NOTICE / HINT HINT:
Use the same procedure for the RH and LH sides.
The procedure listed below is for the LH side.
PROCEDURE 1. INSTALL REAR DRIVE SHAFT ASSEMBLY LH (
SEE MORE:
Telephone Main Antenna Circuit Short to Ground (B15CB11,B15CB13)
DESCRIPTION This DTC is stored when the DCM (telematics transceiver) detects an open or a short in the telephone and GPS antenna (roof antenna assembly) circuit. DTC No. Detection Item DTC Detection Condition Trouble Area B15CB11 Telephone Main Antenna Circuit Short to Ground Teleph
Removal
REMOVAL CAUTION / NOTICE / HINT HINT:
Use the same procedure for the RH and LH sides.
The procedure listed below is for the LH side.
PROCEDURE 1. REMOVE NO. 3 DECK BOARD SUB-ASSEMBLY Click here 2. REMOVE REAR DECK FLOOR BOX Click here 3. REMOVE DECK FLOOR BOX LH Click here 4. PRECAUTIO
© 2016-2026 Copyright www.lexunx.com
