Lexus NX: Installation
INSTALLATION
PROCEDURE
1. INSTALL FORWARD RECOGNITION CAMERA
NOTICE:
- When replacing the forward recognition camera, replace it with a new one.
- If the forward recognition camera has been struck or dropped, replace it with a new one.
- If the forward recognition camera is not properly installed, forward recognition camera optical axis learning cannot be performed properly. Make sure the forward recognition camera is installed securely.
- Do not touch the camera lens or the front windshield glass in front of the camera.
- Replace the forward recognition camera if there is any foreign matter on the camera lens.
- When replacing the forward recognition camera, do not dirty or damage the lens.
- If the forward recognition camera bracket is deformed or damaged, replace it together with the windshield glass.
- When replacing the windshield glass of a vehicle equipped with a forward recognition camera, make sure to use a Lexus genuine part. If a non-Lexus genuine part is used, the forward recognition camera may not be able to be installed due to a missing bracket. Also the dynamic radar cruise control system, front camera system, lane tracing assist system, road sign assist system, pre-collision system or automatic high beam system may not operate properly due to a difference in the transmissivity or black ceramic border.
-
If there is any foreign matter on the area of the windshield glass in front of the forward recognition camera, clean the windshield glass before installing the forward recognition camera. Install the hood with heater sub-assembly and forward recognition camera.
Forward recognition hood removal: Click here
.gif)
Forward recognition hood installation: Click here
(a) When using a new forward recognition camera:
| (1) Remove the protective film. NOTICE: Do not touch the camera lens after removing the protective film. |
|
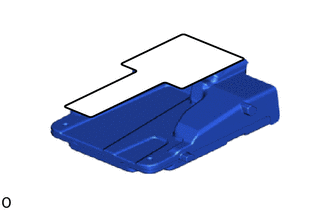
(b) Attach the guide to install the forward recognition camera as shown in the illustration.
NOTICE:
Do not touch the camera lens.
.png) | Install in this Direction |
(c) Connect the connector.
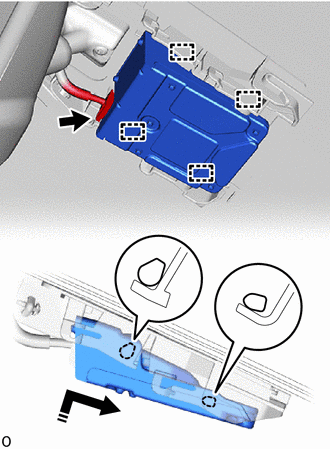
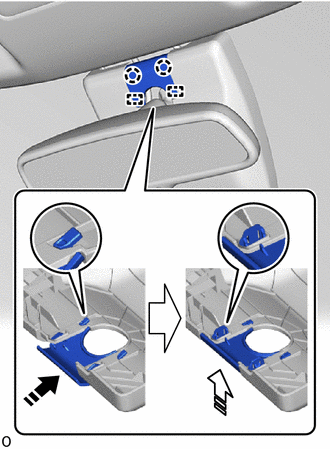
2. INSTALL FORWARD RECOGNITION LATCH
NOTICE:
Before installing the forward recognition latch, be sure to check that the forward recognition camera is securely installed.
(a) Attach the guide and claw as shown in the illustration to install the forward recognition latch.
| *a | Securely attach the claw |
| | Install in this Direction |
NOTICE:
Check that the forward recognition latch is securely installed.
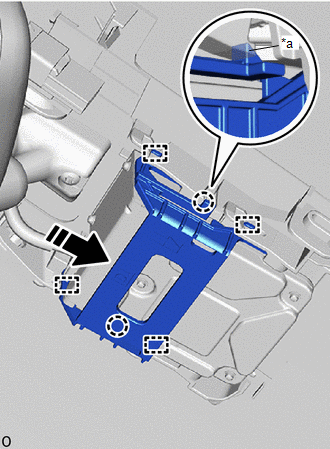
3. INSTALL NO. 1 FORWARD RECOGNITION COVER
| | Install in this Direction |
(a) Attach the guide and clip as shown in the illustration to install the No. 1 forward recognition cover.
NOTICE:
When installing, press the cover parallel to the windshield glass surface and install.
HINT:
Check the locking sound of the clip when attaching it.
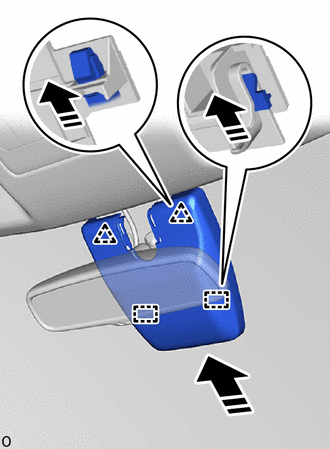
4. INSTALL NO. 2 FORWARD RECOGNITION COVER
| | Install in this Direction(1) |
.png) | Install in this Direction(2) |
(a) Attach the guide in the direction indicated by the arrow (1) as shown in the illustration.
NOTICE:
Insert the guide all the way.
(b) Attach the claw in the direction indicated by the arrow (2) as shown in the illustration to install the No. 2 forward recognition cover.
NOTICE:
If the claw are attached separately they may become damaged. Therefore, attach them at the same time.
5. ADJUST FORWARD RECOGNITION CAMERA
(a) If the forward recognition camera has been replaced with a new one or the windshield glass has been removed and installed, it is necessary to perform Forward Recognition Camera Learning.
HINT:
Forward Recognition Camera Learning can be performed by using either One Time Recognition or Sequential Recognition.
One Time Recognition:Click here
Sequential Recognition:Click here
READ NEXT:
 Before Starting Adjustment
BEFORE STARTING ADJUSTMENT CAUTION / NOTICE / HINT NOTICE: When replacing the windshield glass of a vehicle equipped with a forward recognition camera, make sure to use a Lexus genuine part. If a non-
Adjustment (one Time Recognition)
ADJUSTMENT (ONE TIME RECOGNITION) CAUTION / NOTICE / HINT NOTICE: Make sure to read Before Starting Adjustment before proceeding with work. Click here PROCEDURE 1. SECURE APPROPRIATE AREA FOR PERFOR
Adjustment (sequential Recognition)
ADJUSTMENT (SEQUENTIAL RECOGNITION) CAUTION / NOTICE / HINT NOTICE: Make sure to read Before Starting Adjustment before proceeding with work. Click here PROCEDURE 1. SECURE APPROPRIATE AREA FOR PERF
SEE MORE:
Components
COMPONENTS ILLUSTRATION *1 DECK FLOOR BOX LH *2 REAR DECK FLOOR BOX *3 UPPER INSTRUMENT PANEL *4 AUXILIARY BATTERY NEGATIVE TERMINAL N*m (kgf*cm, ft.*lbf): Specified torque - - ILLUSTRATION *1 INSTRUMENT PANEL PASSENGER AIRBAG ASSEMBLY *2 NO. 2 INSTRUMENT
Inspection
INSPECTION PROCEDURE 1. INSPECT CHARCOAL CANISTER ASSEMBLY (a) Visually check the charcoal canister assembly for cracks or damage. If cracks or damage is found, replace the charcoal canister assembly. (b) Check the canister operation. *1 Connector *a Vent Line Port *b
