Lexus NX: Installation
INSTALLATION
PROCEDURE
1. INSTALL AIR CONDITIONER PRESSURE SENSOR
(a) Remove the vinyl tape from the liquid pipe sub-assembly and the connecting part of the air conditioner pressure sensor.
(b) Apply sufficient compressor oil to the O-ring of a new air conditioner pressure sensor and the connecting surface.
Compressor Oil:
ND-OIL 11 or equivalent
NOTICE:
Keep the O-rings and O-ring fitting surfaces free of foreign matter.
| (c) Using a 27 mm deep socket wrench, install the air conditioner pressure sensor. Torque: 10.8 N·m {110 kgf·cm, 8 ft·lbf} |
|
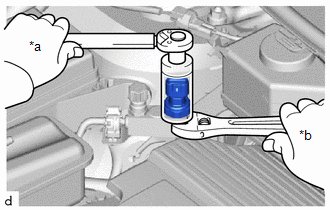
(d) Connect the connector.
2. CHARGE AIR CONDITIONING SYSTEM WITH REFRIGERANT
Click here .gif)
3. WARM UP COMPRESSOR
Click here
4. INSPECT FOR REFRIGERANT LEAK
Click here
READ NEXT:
 Precaution
PRECAUTION PRECAUTION FOR DISCONNECTING CABLE FROM NEGATIVE AUXILIARY BATTERY TERMINAL NOTICE:
After the power switch is turned off, there may be a waiting time before disconnecting the negative (-
Parts Location
PARTS LOCATION ILLUSTRATION *A for 2WD *B for AWD *1 AIR CONDITIONING TUBE AND ACCESSORY ASSEMBLY (AIR CONDITIONER PRESSURE SENSOR) *2 THERMISTOR ASSEMBLY (AMBIENT TEMPERATURE SENS
SEE MORE:
Removal
REMOVAL CAUTION / NOTICE / HINT HINT:
Use the same procedure for the RH and LH sides.
The procedure listed below is for the LH side.
PROCEDURE 1. REMOVE FRONT DOOR TRIM COVER LH Click here 2. REMOVE FRONT DOOR INSIDE HANDLE BEZEL PLUG LH Click here 3. REMOVE POWER WINDOW REGULATOR MAST
Lost Communication with Rear Gate Module (U0230)
DESCRIPTION DTC No. Detection Item DTC Detection Condition Trouble Area DTC Output from U0230 Lost Communication with Rear Gate Module There is no communication from the multiplex network door ECU.
Power source circuit of multiplex network door ECU
Multiplex network door EC
© 2016-2026 Copyright www.lexunx.com
