
Lexus NX: Installation
INSTALLATION
PROCEDURE
1. INSTALL CONSOLE BOX ILLUMINATION LIGHT ASSEMBLY (w/ Wireless Charger)
| (a) Attach the 2 claws to install the console box illumination light assembly. |
|
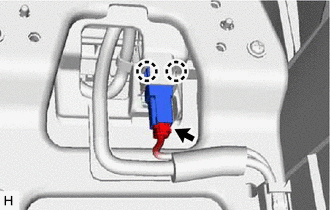
(b) Connect the connector.
2. INSTALL REAR CONSOLE END PANEL SUB-ASSEMBLY (w/ Wireless Charger)
Click here .gif)
3. INSTALL CONSOLE BOX ILLUMINATION LIGHT ASSEMBLY (w/o Wireless Charger)
| (a) Attach the 2 claws to install the console box illumination light assembly. |
|
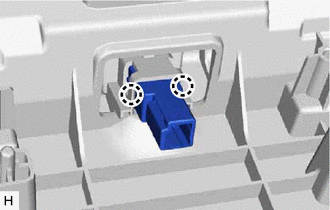
| (b) Connect the connector. |
|
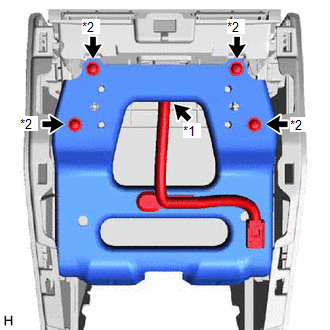
(c) Install the bracket with wire harness with the 4 screws.
4. INSTALL CONSOLE COMPARTMENT DOOR SUB-ASSEMBLY (w/o Wireless Charger)
Click here
5. INSTALL CONSOLE BOX ASSEMBLY (w/o Wireless Charger)
Click here
READ NEXT:
 Footwell Light
ComponentsCOMPONENTS ILLUSTRATION *A for Driver Side *B for Front Passenger Side *1 NO. 1 INSTRUMENT PANEL UNDER COVER SUB-ASSEMBLY *2 NO. 1 INTERIOR ILLUMINATION LIGHT ASSEMBLY L
Front Door Courtesy Switch
ComponentsCOMPONENTS ILLUSTRATION *1 FRONT DOOR COURTESY LIGHT SWITCH ASSEMBLY - - N*m (kgf*cm, ft.*lbf): Specified torque - - RemovalREMOVAL CAUTION / NOTICE / HINT HINT:
SEE MORE:
Initialization
INITIALIZATION NOTICE:
The necessary procedures (adjustment, calibration, initialization or registration) that must be performed after parts are removed and installed, or replaced during headlight ECU sub-assembly LH removal/installation are shown below. Performed Work or System Condition Ne
Removal
REMOVAL PROCEDURE 1. REMOVE REAR STABILIZER LINK ASSEMBLY LH (a) Remove the 2 nuts and 2 cushions and disconnect the rear stabilizer link assembly LH from the rear No. 2 suspension arm assembly LH. HINT: If the ball joint turns together with the nut, use a 6 mm hexagon wrench to hold the stud.
© 2016-2026 Copyright www.lexunx.com
